Appearance
Style Editor Tool
Overview
The Style Editor is a layer visualisation management system that provides comprehensive customisation of vector layer visual properties. This tool integrates with Horizon's unified layer management system to deliver professional-grade styling capabilities, including dynamic symbology modification, advanced labelling configuration, transparency control, and real-time style application for enhanced cartographic presentation and spatial data visualisation.
Interface Access
Opening Editor
There are two ways in, and they differ only in whether a layer is already chosen for you.
From the toolbar — click the Style button in the toolbar. The Style Panel opens straight away with no layer selected, and you choose one from the Layer dropdown at the top. You no longer have to visit the layer list first.
From the layer list — open the layer's menu in the Layers Panel and choose Change Style. The panel opens already pointed at that layer. Choosing Change Style again on the layer that is already open closes the panel.

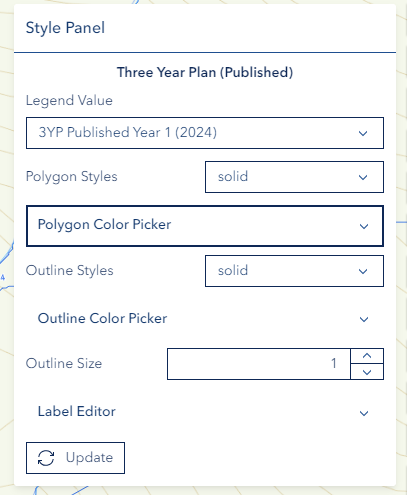
The Layer Dropdown
The Layer dropdown sits at the top of the panel and lists every styleable layer currently visible on the map. Pick one and its style controls load underneath — geometry type, legend values, symbol and label settings are all read from the layer you choose.
- The list is re-read from the map each time you open the dropdown, so layers you have just added, removed or switched on appear without reopening the panel.
- Until you pick something, the panel shows No Layer Selected with the prompt "Pick a layer from the dropdown above to edit its symbols and labels."
- If nothing on the map qualifies, it shows No Styleable Layers instead: "No visible feature or map image layer is on the map. Turn a layer on, then reopen this dropdown."
- Selecting a layer in the layer list with Change Style always re-points the panel, even if you had picked a different one from the dropdown.
TIP
If the layer you want is missing from the dropdown, the usual reason is that it is switched off — either the layer itself, or a group it sits inside. Turn it on and reopen the dropdown.
Supported Layer Types
The Style Panel edits vector symbology, so it offers these layer types:
- Feature Layers — all geometry types (point, multipoint, polyline, polygon)
- Map Image Layers — styleable sublayers appear in a Sublayer dropdown, and you style one sublayer at a time
- CSV layers — point layers added through the Upload panel
- WFS layers
The following are not styleable here and do not appear in the Layer dropdown:
- Raster and imagery layers — raster symbology is set in the Imagery Tool, under Report Tools
- Tile layers
- WMS layers
- Graphics layers
If you choose Change Style on one of those from the layer list, Horizon replies with Cannot Style This Layer and points you at the Imagery Tool rather than opening an empty panel.
Layers that are switched off are not offered
The dropdown lists only layers that are genuinely drawn on the map. A layer inside a switched-off group is not offered, even though the layer itself is ticked — you would otherwise be styling something you cannot see. A layer you are already styling stays selectable if you switch it off mid-edit.
System-managed editor layers are excluded
The FPP, Plan Burn, Wildfire and Cart Route layer families do not appear in the Layer dropdown, and Change Style on one of them reports Style Panel Restricted. Their symbols are predefined and managed by Horizon.
Sketch layers are the exception — they are available, and are the editor family you are meant to be able to restyle.
INFO
When a Map Image Layer is selected, the Style Editor filters to show only sublayers that have a renderer and a geometry type. Raster sublayers are excluded.
Layer Styling
Style Selection
- Choose a layer from the Layer dropdown
- For a Map Image Layer, choose the Sublayer you want to style
- The editor auto-detects the geometry type and displays the appropriate controls
Polygon Style Properties
- Fill colour with alpha/transparency channel (RGBA)
- Outline colour with alpha channel
- Outline width — 0 to 10 pixels
- Outline style — same 11 dash patterns as polylines (see table below)
- Fill style — 8 patterns available:
| Fill Style | Description |
|---|---|
| solid | Solid fill |
| backward-diagonal | Diagonal lines (top-left to bottom-right) |
| cross | Cross-hatch pattern |
| diagonal-cross | Diagonal cross-hatch |
| forward-diagonal | Diagonal lines (bottom-left to top-right) |
| horizontal | Horizontal lines |
| vertical | Vertical lines |
| none | No fill (outline only) |
Polyline Style Properties
- Line colour with alpha channel
- Line width — 0 to 10 pixels
- Line style — 11 dash patterns:
| Line Style | Description |
|---|---|
| solid | Continuous line |
| dash | Standard dashes |
| dash-dot | Dash-dot alternating |
| dot | Dotted line |
| long-dash | Long dashes |
| long-dash-dot | Long dash with dot |
| long-dash-dot-dot | Long dash with two dots |
| short-dash | Short dashes |
| short-dash-dot | Short dash with dot |
| short-dash-dot-dot | Short dash with two dots |
| short-dot | Short dots |
Line Markers
Polylines support optional endpoint markers:
- Marker styles: arrow, circle, square, diamond, cross, x
- Marker placement: begin, end, or begin-end
- Marker colour with alpha channel
Point Style Properties
- Marker style — 6 shapes: circle, cross, diamond, square, triangle, x
- Marker size — 0 to 50 pixels
- Marker colour with alpha channel
INFO
Image-based markers are detected but cannot be edited through the Style Editor.
Applying Changes
- Adjust the desired properties
- Click Update Style
- A confirmation appears: "Style updated successfully."

UPDATE RESTRICTIONS
Update Style is disabled for FPP, Plan Burn, Wildfire and Cart Route editor layers, and for any layer that failed to load — in which case the panel tells you which of the two applies. Only Sketch editor layers and non-editor layers can be updated directly.
Reset Style
Reset Style sits next to Update Style and does the opposite: it discards the styling you have applied and restores the layer's published appearance — both its symbols and its labels. A confirmation appears when it finishes: "Style reset to the layer default."
The button is red because it throws work away. Its tooltip reads "Discard your changes and restore this layer's published style."
What it restores
- Map Image Layers — the sublayer currently chosen in the Sublayer dropdown, not simply the first one in the list. Check the sublayer selection before you press it.
- My Layers — a saved personal layer resets to your own symbol from Settings → Graphics Styles → MyLayer Graphics, not to a service default. Change that setting and reset again to see the new symbol.
- Horizon's own symbology — where Horizon draws a layer with its own standard symbols rather than the published ones, those come back too. A Sketch line, for example, returns to the black arrow it is drawn with normally.
When it is unavailable
- CSV and WFS layers — the button is disabled. The Style Panel can style them, but they are built in the browser rather than read from a feature service, so there is no published style to restore.
- A layer that failed to load, and while a reset is still running.
Also available from the layer list
The layer's menu in the Layers Panel carries its own Reset Style action. Used from there it also works on the system-managed editor layers — FPP, Plan Burn, Wildfire and Cart Route — even though those layers cannot be opened in the Style Panel for editing. From the layer list a Map Image Layer resets its first visible sublayer, because the menu has no notion of which sublayer you are working on.
Reset cannot be undone
Resetting discards the colours, widths, patterns and label settings you applied to that layer. There is no undo — if you want to keep the look you have built, note the settings before you reset.
Unique Value Renderer Support
When a layer styles its features by a field value (such as species type or status code), the Style Editor automatically:
- Detects that the layer is styled per value
- Populates a Legend Value dropdown with all the values
- Lets you select a specific value and modify its symbol independently
- Keeps each value's symbol separate, so editing one does not change the others
This enables per-category styling without affecting other categories in the same layer.
Editor Layer Symbols
Editor layers already draw with Horizon's standard symbology, and it is applied for you — a Sketch line's black arrow, for example, does not have to be chosen. When the panel recognises one of these symbols it says so above the controls, and you can adjust the settings underneath from there.
INFO
Complex symbols defined on the server are read-only. The panel shows a Complex Symbol (Read-Only) notice when it finds one, and only the layer's labels can be styled.
Overriding a server-defined symbol
When an editor layer draws with a symbol defined on the server, the panel shows a Server-Defined Symbol notice containing a dropdown — "Select a client-side preset to override". Choosing a preset replaces the server symbol with a standard Horizon one.
The presets on offer depend on the layer:
| Preset | Appearance | Offered for |
|---|---|---|
| Black Arrow | Black solid line with an arrow marker at the end | All editor layers |
| Strip Light | Red solid line with an arrow marker | Plan Burn, Wildfire |
| Spot Light | Red dashed line with an arrow marker | Plan Burn, Wildfire |
| Active Fire Edge | Red short-dotted line | Wildfire |
| Custom | Configure the properties yourself | All editor layers |
INFO
This dropdown appears for editor layers other than Sketch, and only while the layer is using a server-defined symbol. Sketch layers are styled directly with the controls above instead.
Label Editing
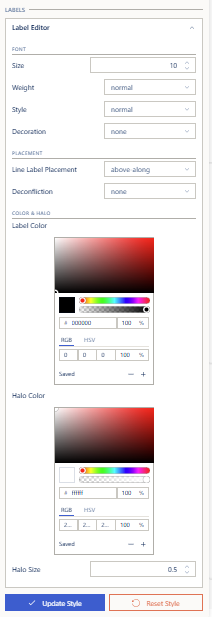
Label Properties
- Font size — 1 to 20 pixels
- Font weight — normal, bold, bolder, lighter
- Font style — normal, italic, oblique
- Font decoration — none, underline, line-through
- Label colour with alpha channel
- Deconfliction strategy — none or static
Halo Properties
- Halo colour with alpha channel (default: transparent)
- Halo size — 0 to 10 pixels in 0.5-pixel steps
Placement Rules
Label placement options vary by geometry type:
Point layers (9 placements):
| Placement | Position |
|---|---|
| above-center | Above, centred |
| above-left | Above, left-aligned |
| above-right | Above, right-aligned |
| center-center | Centred on feature |
| center-left | Centred, left-aligned |
| center-right | Centred, right-aligned |
| below-center | Below, centred |
| below-left | Below, left-aligned |
| below-right | Below, right-aligned |
Line layers (3 placements):
| Placement | Position |
|---|---|
| above-along | Above the line, following curvature |
| center-along | Centred on the line |
| below-along | Below the line, following curvature |
Polygon layers (1 placement):
| Placement | Position |
|---|---|
| always-horizontal | Horizontal text at polygon centre |
Troubleshooting
| Issue | Solution |
|---|---|
| Changes not visible | Check layer visibility |
| Layer missing from Layer dropdown | It must be a feature, map image, CSV or WFS layer, visible on the map (and inside a group that is switched on), and not an FPP, Plan Burn, Wildfire or Cart Route layer |
| Style options unavailable | Raster, imagery, tile, WMS and graphics layers cannot be styled here — use the Imagery Tool under Report Tools for raster symbology |
| No sublayers in dropdown | Only sublayers with renderers and geometry types are shown; raster sublayers are excluded |
| Label options missing | Confirm the layer actually carries labels |
| Update Style button disabled | FPP, Plan Burn, Wildfire and Cart Route layers cannot be updated, and a layer that failed to load cannot either |
| Reset Style button disabled | CSV and WFS layers have no published style to restore; the button is also off while a reset is running |
| Complex symbol read-only notice | Server-defined complex symbols cannot be edited — only the labels can be styled |