Appearance
Viewshed Point Editor Tool
Overview
The Viewshed Point Editor Tool is a specialized visibility analysis preparation system for creating and managing observation points used in viewshed analysis. It supports both automated random point distribution within selected polygons and manual point placement, with configurable point counts and bearing angles.
Interface Access
Tool Launch
- Find Viewshed Points Editor icon
- Open editor panel

Panel Layout
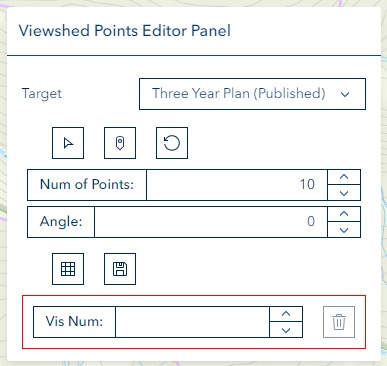
The panel is organized into three sections:
| Section | Contents |
|---|---|
| Draw row | Select Target Shape, Draw Reference Point, and Reset buttons |
| Actions row | Generate (random points) and Save buttons |
| Parameters | Total area display, Max Points indicator, Num of Points input, Angle input |
| Delete section | Vis Num input and Delete button (outlined in red) |
Target Layer Selection
Before selecting shapes, choose the target layer from the Target Layer dropdown at the top of the panel.
- The dropdown refreshes automatically when clicked, showing all currently visible polygon layers
- Supported layer types:
- FeatureLayers with polygon geometry
- MapImageLayers that contain polygon sublayers
- Changing the selection deactivates any active selection mode
Point Creation
Selecting Target Shapes
Target shapes define the area within which random points are generated.
- Choose a layer from the Target Layer dropdown
- Click the Select Target Shape button (cursor icon) to activate selection mode — the button icon changes to indicate active state
- Click polygons on the map to select them (highlighted with a target symbol)
- Click a selected polygon again to deselect it (toggle behavior)
- Click the Select Target Shape button again to deactivate selection mode
TIP
The Total (ha) readout below the toolbar updates as you select polygons, showing the cumulative area of all selected shapes. This value determines the maximum number of points available.
MapImageLayer cycling
When clicking on a MapImageLayer location with multiple overlapping polygons, each subsequent click on the same spot cycles to the next polygon. A notification shows which feature was selected (e.g., "feature 2 of 3").
Random Generation
Generates evenly distributed viewshed points within the selected target area.
- Select at least one target shape (see above)
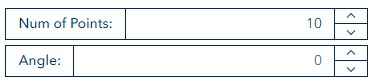
- Configure parameters:
- Num of Points — number of points to generate (1 to max)
- Angle — rotation angle for the point grid (0–180 degrees)
- Click Generate

Max Points limit
The maximum number of points depends on the total area of selected shapes:
- Area < 50 ha → maximum 10 points
- Area ≥ 50 ha → maximum 15 points
The Max Points indicator on the panel updates dynamically as you select shapes. Increasing the selected area unlocks more points.
WARNING
If the selected area is too small or irregular to fit the requested number of points, a warning shows how many points could be generated (e.g., "Only 8 out of 10 points could be generated due to space constraints").
Generating new random points clears any previously generated reference points before creating the new set.
Manual Addition
Place individual reference points directly on the map.
Click the Draw Reference Point button (pin icon) to activate draw mode — the button icon changes to indicate active state

Click anywhere on the map to place points
Each click adds a new reference point (duplicate points at the same location are ignored)
Click the Draw Reference Point button again to deactivate draw mode
INFO
Manual points and randomly generated points can be combined before saving.
Reset
Click the Reset button (reset icon) to clear all selected target shapes and reference points and deactivate any active selection or drawing mode.
Point Management
Saving Points
Saves all current reference points to the database as a new viewshed point set.
Draw or generate reference points on the map
Click the Save button

On success, a notification shows the assigned viewshed point number (e.g., "Viewshed points with number 42 have been saved successfully")
WARNING
- Save requires at least one reference point — clicking Save with no points shows an error
- If more than 15 reference points are drawn, only the first 15 are saved; a warning is shown
After saving, the reference point graphics and target shapes are cleared from the map automatically.
Point Deletion
Delete an existing viewshed point set by its visibility number.
Enter the visibility number in the Vis Num field

Click the Delete button (trash icon) — this button is disabled until a vis number is entered
INFO
The Delete button only enables when a vis number is entered in the field.
Delete Confirmation Dialog
When you click the Delete button, a confirmation dialog appears to prevent accidental deletion.
Dialog Details:
- Heading: "Delete Viewshed Points?"
- Kind: Danger (red indicator)
- Modal: Yes — you must respond before continuing
- Content: Displays the viewshed point number being deleted and warns that the action cannot be undone
- Footer Buttons:
- Cancel (left) — closes the dialog without changes
- Delete (right, red) — permanently removes the viewshed points
The dialog prevents closing via the Escape key or clicking outside, ensuring you make an explicit choice.
Troubleshooting
| Issue | Solution |
|---|---|
| No layers appear in the Target Layer dropdown | Ensure at least one polygon FeatureLayer or MapImageLayer with polygon sublayers is visible on the map |
| Select Target Shape button is hidden | The button only appears when a target layer is selected in the dropdown |
| Generate button does nothing | Select at least one target shape first — "Please select at least one target shape first" error appears if none selected |
| Fewer points generated than requested | The selected area may be too small or irregular; try selecting a larger target area or reducing Num of Points |
| Max Points shows 10 instead of 15 | Selected area is below 50 ha; select more polygons to increase total area above 50 ha |
| Save fails with no error | Ensure at least one reference point is drawn or generated before saving |
| Only 15 points saved despite drawing more | The system saves a maximum of 15 points; a warning is shown when this limit is exceeded |
| Delete button is greyed out | Enter a visibility number in the Vis Num field first |
| Features not visible after saving | Check that the Viewshed Points layer is visible in the layer panel |
Video Tutorials
Random Point Generation
Manual Point Creation
Point Deletion Tutorial
See Also
- Plot Random Tool - Random plot generation using polygon boundaries
- Concepts: FeatureLayer vs MapImageLayer - Understanding layer types used for polygon selection
- Advanced Editor - Geometric operations for spatial analysis