Appearance
Add Layer Tool
Overview
Horizon provides two tools for bringing spatial data into the map:
| Tool | Icon | Purpose |
|---|---|---|
| Layer Catalog | Browse Catalog icon | Browse and add layers from Horizon's built-in data catalog, or connect to external ArcGIS REST, WMS, and WMTS services |
| Upload File to Map | Upload icon | Load local spatial files (KML, GPX, Shapefile, ZIP, CSV) directly from your computer |
Both tools are available as action buttons in the right toolbar.
Layer Catalog
Opening the Layer Catalog

- Click the Browse Catalog icon in the right toolbar
- The Layer Catalog dialog opens — a resizable, draggable 3-panel interface:
- Left — Filter Sidebar (categories and layer type filters)
- Centre — Layer List with search and toolbar
- Right — Preview Panel (opens when you preview a layer)
- Click the icon again, or click Close, to dismiss the dialog
INFO
The dialog title shows the count of matching layers, e.g. Layer Catalog (42 of 180 layers).
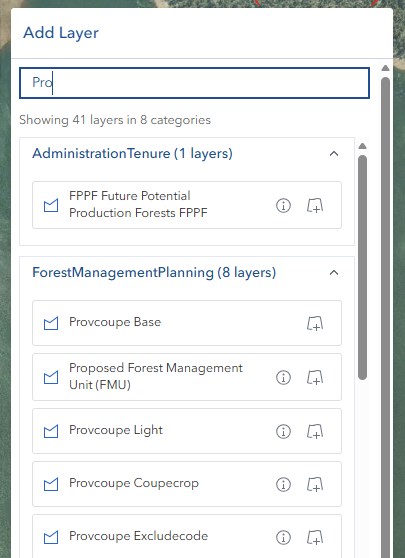
Searching Layers
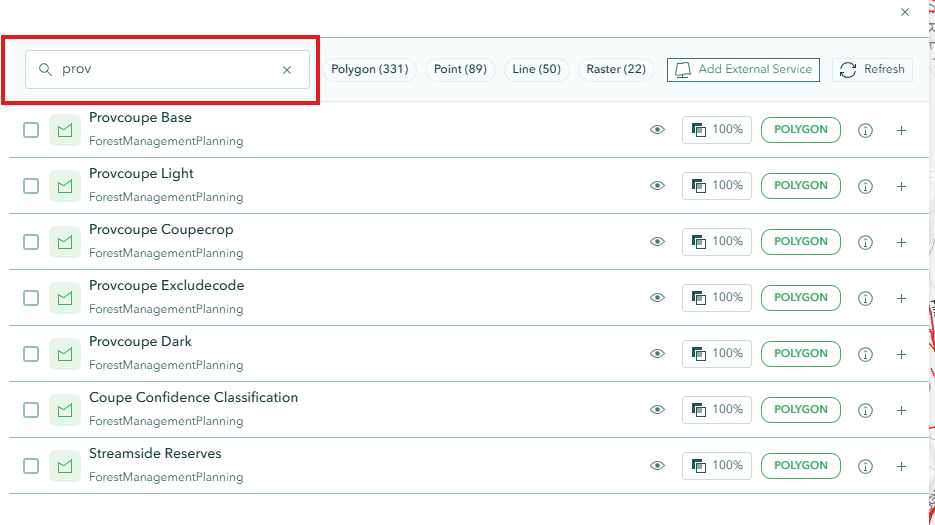
- The Search box at the top of the layer list filters layers in real time (300 ms debounce) as you type
- Search matches layer name, category, or description
- Click the × inside the search box to clear the search term
Filtering Layers
Two types of filters work together to narrow down the list:
Geometry Type Quick Filters

Chips in the toolbar (Point, Line, Polygon, etc.) toggle geometry type filters on and off:
- Click a chip to activate it (highlighted in blue) — only layers with that geometry type are shown
- Click again to remove the filter
- Multiple geometry types can be active at the same time
Filter Sidebar

Click Show Filters / Hide Filters in the dialog footer to expand or collapse the sidebar.
The sidebar contains two filter sections:
Categories
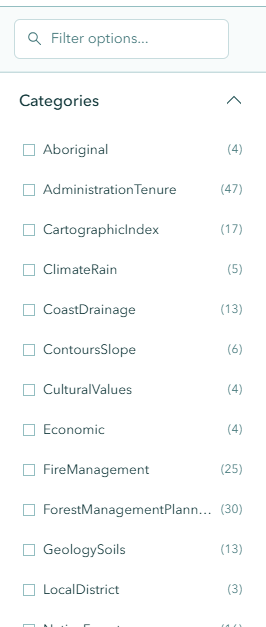
- Organised as an accordion list grouped by data category
- Click any category name to toggle it on or off
- The sidebar has its own search box to find categories by name or by layer name within a category
- Active categories appear as closable chips in the Active Filters Bar
Layer Types
Filter by the technical type of the layer:
| Layer Type | Description |
|---|---|
| Feature Layer | Vector features (point, line, or polygon) with attribute data |
| Map Image | ArcGIS MapServer layers rendered as images |
| WMS | OGC Web Map Service (raster tiles) |
| WMTS | OGC Web Map Tile Service (cached tiles) |
| Tile Layer | Cached tile layers |
| Group Layer | Grouped sets of related layers |
Active Filters Bar
When one or more category or layer type filters are active, the Active Filters Bar appears below the toolbar:
- Collapsed view: Shows a summary chip count and filter preview; click the expand chevron to see all chips
- Expanded view: Shows each active filter as a closable chip — click the × on any chip to remove it
- Clear All: Removes all active category and layer type filters in one click
Layer List
Each item in the layer list shows:
- Layer name and type badge
- Add button — adds the layer immediately to the map
- Preview button — opens the Preview Panel on the right
- Checkbox — selects the layer for batch addition via the Selection Cart
- Visibility toggle and opacity slider (available when layer is selected)
Click a layer's checkbox or the preview button to inspect it before adding.
INFO
For large catalogs (more than 50 layers), the list uses virtual scrolling for performance.
Layer Preview Panel
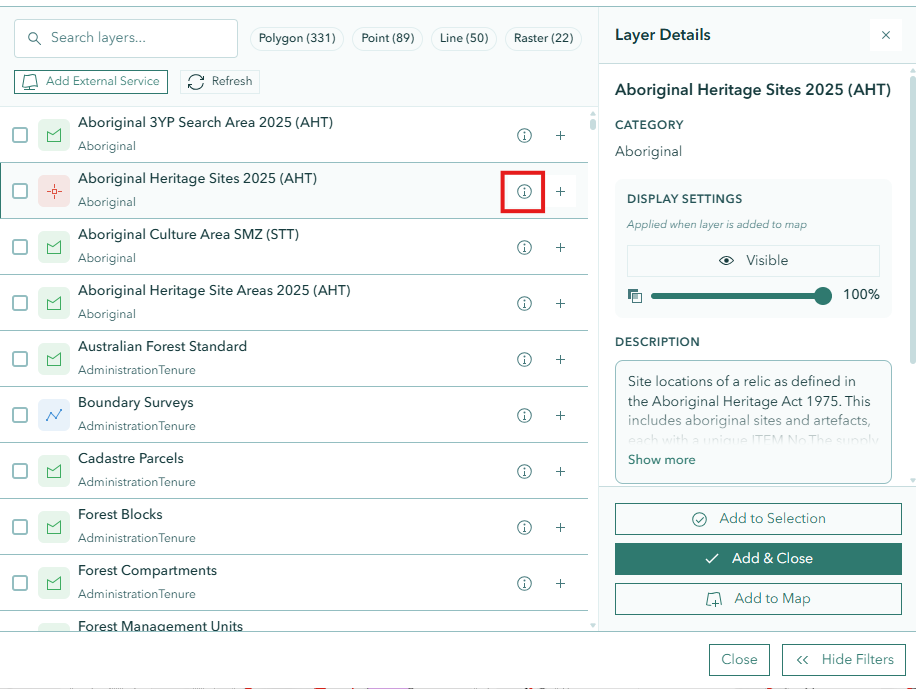
Clicking Preview on any layer opens a panel on the right side of the dialog showing:
- Layer title and category
- Geometry type and layer type
- Description (expandable for long text)
- Metadata link (if available)
- Visibility toggle — pre-set visibility before adding
- Opacity slider — pre-set opacity before adding
- Add to Selection — adds the layer to the Selection Cart for batch addition
- Add & Close — adds the layer and closes the dialog
- Add to Map — adds the layer with the current visibility/opacity settings
Close the preview panel with the × button to return to a two-column layout.
Selection Cart
The Selection Cart at the bottom of the layer list lets you batch-select layers and add them all at once:
- Check the checkbox on one or more layer items to select them
- The cart expands to show the selected layers with their names
- Click Add X Layers to Map to add all selected layers simultaneously
- Remove (×) individual layers from the cart before adding
- Clear All clears all selections (with a confirmation prompt for more than 3 layers)
- Undo restores a recently removed selection for a short window
INFO
There is a maximum number of layers that can be queued at one time. Exceeding this limit disables the batch add button.
Adding External Services
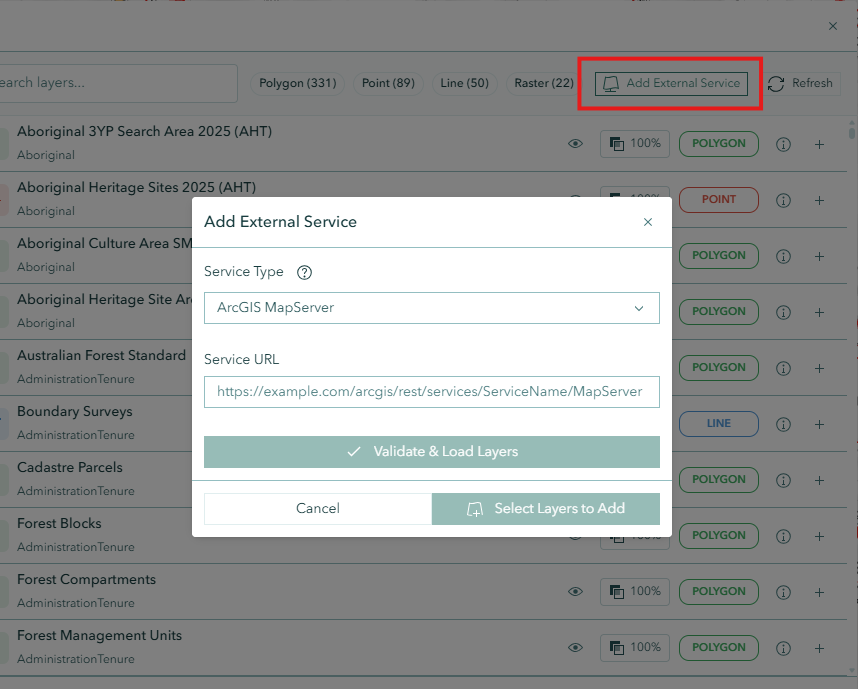
Click the Add External Service button in the Layer Catalog toolbar to connect to an external map service.
Supported Service Types
| Service Type | Description |
|---|---|
| ArcGIS MapServer | Standard ArcGIS map service with one or more layers |
| ArcGIS FeatureServer | Editable feature layers with query capabilities |
| ArcGIS ImageServer | Satellite imagery, aerial photos, or raster datasets |
| ArcGIS VectorTileServer | High-performance vector tile basemaps |
| WMS | OGC Web Map Service (cross-platform raster layers) |
| WMTS | OGC Web Map Tile Service (cached tile layers) |
Steps
Click Add External Service in the Layer Catalog toolbar
Select the Service Type from the dropdown (or leave on auto-detect — the type is inferred from the URL)
Paste or type the Service URL into the URL field
Example URLs:
- MapServer:
https://example.com/arcgis/rest/services/MyService/MapServer - FeatureServer:
https://example.com/arcgis/rest/services/MyService/FeatureServer/0 - WMS:
https://example.com/wms?service=WMS - WMTS:
https://example.com/wmts?service=WMTS
- MapServer:
Click Validate & Load Layers (or press Enter)
The service is contacted and available layers are listed
Check the layers you want to add (use Select All / Deselect All as needed)
Use the search box to filter by layer name if the list is long
Click Add X Layer(s) to Map
Auto-Detection
The service type is automatically detected from the URL — for example, a URL containing /MapServer switches the type to ArcGIS MapServer. You do not need to set the service type manually.
Error Messages
| Error | Cause |
|---|---|
| Network error: Unable to reach the service | The server is down or the URL is unreachable |
| Access blocked (CORS restriction) | The service does not allow browser-based access |
| Authentication required | The service requires login credentials |
| Access denied | You do not have permission to access this service |
| Service not found | The URL does not point to a valid service endpoint |
Upload File to Map
Opening the Upload Dialog
- Click the Upload File to Map icon in the right toolbar
- The Upload File to Map dialog opens as a standalone draggable dialog
INFO
The Upload and Layer Catalog dialogs cannot be open at the same time — opening one closes the other.
Supported File Types
| Format | Extension | Notes |
|---|---|---|
| Shapefile | .shp | Single shapefile component; coordinate system must be selected manually |
| Shapefile ZIP | .zip | Recommended — includes .prj file for automatic coordinate detection |
| KML | .kml | Keyhole Markup Language (Google Earth format) |
| GPX | .gpx | GPS Exchange Format for tracks, routes, and waypoints |
| CSV | .csv | Comma-separated values with coordinates; displayed with clustering |
File size limit: 100 MB maximum per upload.
TIP
Use a ZIP bundle for shapefiles whenever possible. The .prj file inside the ZIP is automatically read to determine the correct coordinate system — no manual selection required.
Uploading a File
- Select a file — drag and drop a file onto the drop zone, or click the drop zone to browse for a file
- The file name, type, and size are displayed in the drop zone once selected
- For SHP or ZIP files: set the coordinate system if not auto-detected (see below)
- Click Upload in the dialog footer
- A progress indicator shows the processing stage: Reading → Parsing → Creating → Complete
- On success:
- The layer is added to the map automatically
- The map zooms to fit the uploaded features
- If the file contains polygons, the total area is displayed in hectares
- Click × next to the file name to clear the selection and start again
Coordinate System Selection
For .shp files and ZIP bundles without a .prj file, a coordinate system dropdown is shown:
- Default: GDA94 / MGA Zone 55 (EPSG:28355) — suitable for most Tasmanian data
- Select the appropriate projection to ensure the data is placed correctly on the map
When a ZIP is uploaded that contains a .prj file, the coordinate system is detected automatically and shown as a success notice — no selection is needed.
Managing Added Layers
After adding layers using either tool, manage them through the Layer Panel:
- Visibility — toggle layers on or off
- Transparency — adjust layer opacity
- Ordering — drag layers to reorder them
- Properties — access layer-specific actions via the three-dots menu
See the Layer Panel documentation for full details.
Troubleshooting
| Issue | Solution |
|---|---|
| Layer not appearing after addition | Check layer visibility in the Layer Panel; the layer may be hidden |
| Search returns no results | Try shorter or different keywords; check if category/type filters are active |
| Filter sidebar not visible | Click Show Filters in the dialog footer |
| External service fails to load | Verify the URL is correct and the service is publicly accessible |
| CORS error on external service | The service does not permit browser access; use a different service or proxy |
| Upload fails with "Invalid File Type" | Only .shp, .csv, .kml, .gpx, .zip are supported |
| Upload fails with "File Too Large" | File must be under 100 MB |
| Shapefile appears in wrong location | Select the correct coordinate system before uploading, or use a ZIP with a .prj file |
| ZIP upload has no auto-detected projection | The ZIP does not contain a .prj file; select the coordinate system manually |
| CSV layer not displaying points | Ensure the CSV file has valid coordinate columns |
| Performance issues with many layers | Remove unused layers via the Layer Panel; avoid adding very large datasets simultaneously |
Video Tutorial
Watch this guide on using the Add Layer Tool: