Appearance
Filter Tool
Overview
The Filter Tool is a powerful data analysis and export system that enables comprehensive filtering, querying, and exporting of spatial data from visible map layers. This sophisticated tool provides three filtering modes: Basic for simple attribute queries, Advanced for complex SQL expressions, and Legend for visual symbology-based filtering, combined with high-performance export functionality for seamless data sharing and external use.
Key Features
- Three Filtering Modes: Basic attribute-based filtering, Advanced SQL query builder, and Legend symbology-based filtering for all skill levels
- Filter Editor Dialog: A larger, draggable, resizable pop-out with a visual query builder (nested AND/OR groups), a full SQL editor, and a combined Statistics & Export workspace
- Unique Values Browser: Instantly load, search, and select unique field values from any layer for precise filtering
- Statistical Analysis: Built-in statistics functions (Count, Sum, Average, Min, Max, Standard Deviation)
- Comprehensive Layer Support: Works with visible Feature Layers, Map Image Layers, Group Layers, and data group layers
- Advanced Export System: Export filtered results as Shapefile or KML files with complete attribute preservation
- Performance Optimization: Layer caching system and paginated value loading for improved performance with large datasets
- Case-Sensitive Control: Toggle case sensitivity for text-based queries and precise data matching
- Real-Time Processing: Immediate filter application with visual feedback and automatic zoom to filtered results
Getting Started
Opening the Filter Tool

- Look for the Filter icon in the right panel toolbar
- Click the icon to open the filter panel
- Select a layer from the Layer dropdown
- Choose between Basic, Advanced, or Legend tabs
- For a larger workspace, click the launch / pop-out button (brand-blue border) in the action row to open the Filter Editor dialog
What You Can Do
- Filter data from any visible layer
- Browse and select unique field values interactively
- Create simple attribute-based filters
- Write complex SQL queries for advanced filtering
- Filter by map symbology using the Legend tab
- Calculate statistics on filtered or unfiltered data
- Export filtered results as Shapefile or KML
Supported Layer Types
The Filter Tool works with the following visible layer types:
- Feature Layers — Standard vector feature layers with full query support
- Map Image Layers — ArcGIS Server map services with sublayer query support
- Group Layers — FPP Draft, FPP Production, Plan Burn, Wildfire, and Sketch data groups
Basic Panel
Setting Up a Basic Filter
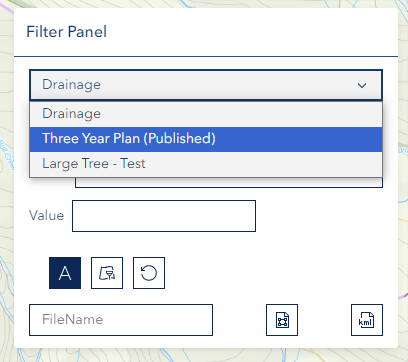
Step 1: Select Layer
- Choose a layer from the Layer dropdown
- Only visible layers will appear in the list
- Click the dropdown to refresh the layer list if a layer was recently made visible
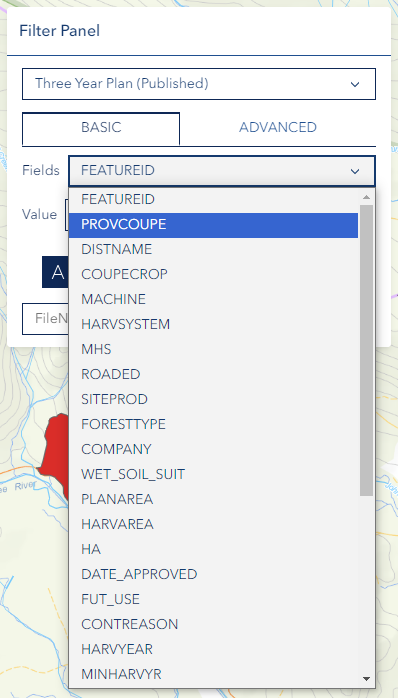
Step 2: Choose Field
- Select the Field you want to filter by from the Fields dropdown
- Fields are automatically populated based on the selected layer
- Consider the data type when making your selection
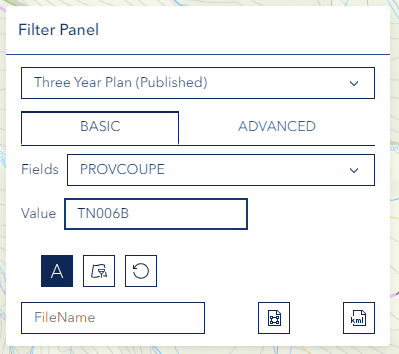
Step 3: Enter Value (or Browse Unique Values)
- Type the Value you want to filter for directly in the text input, or
- Click the list icon (list button) next to the value input to load all unique values for the selected field
- Browse, search, or select a value from the unique values list
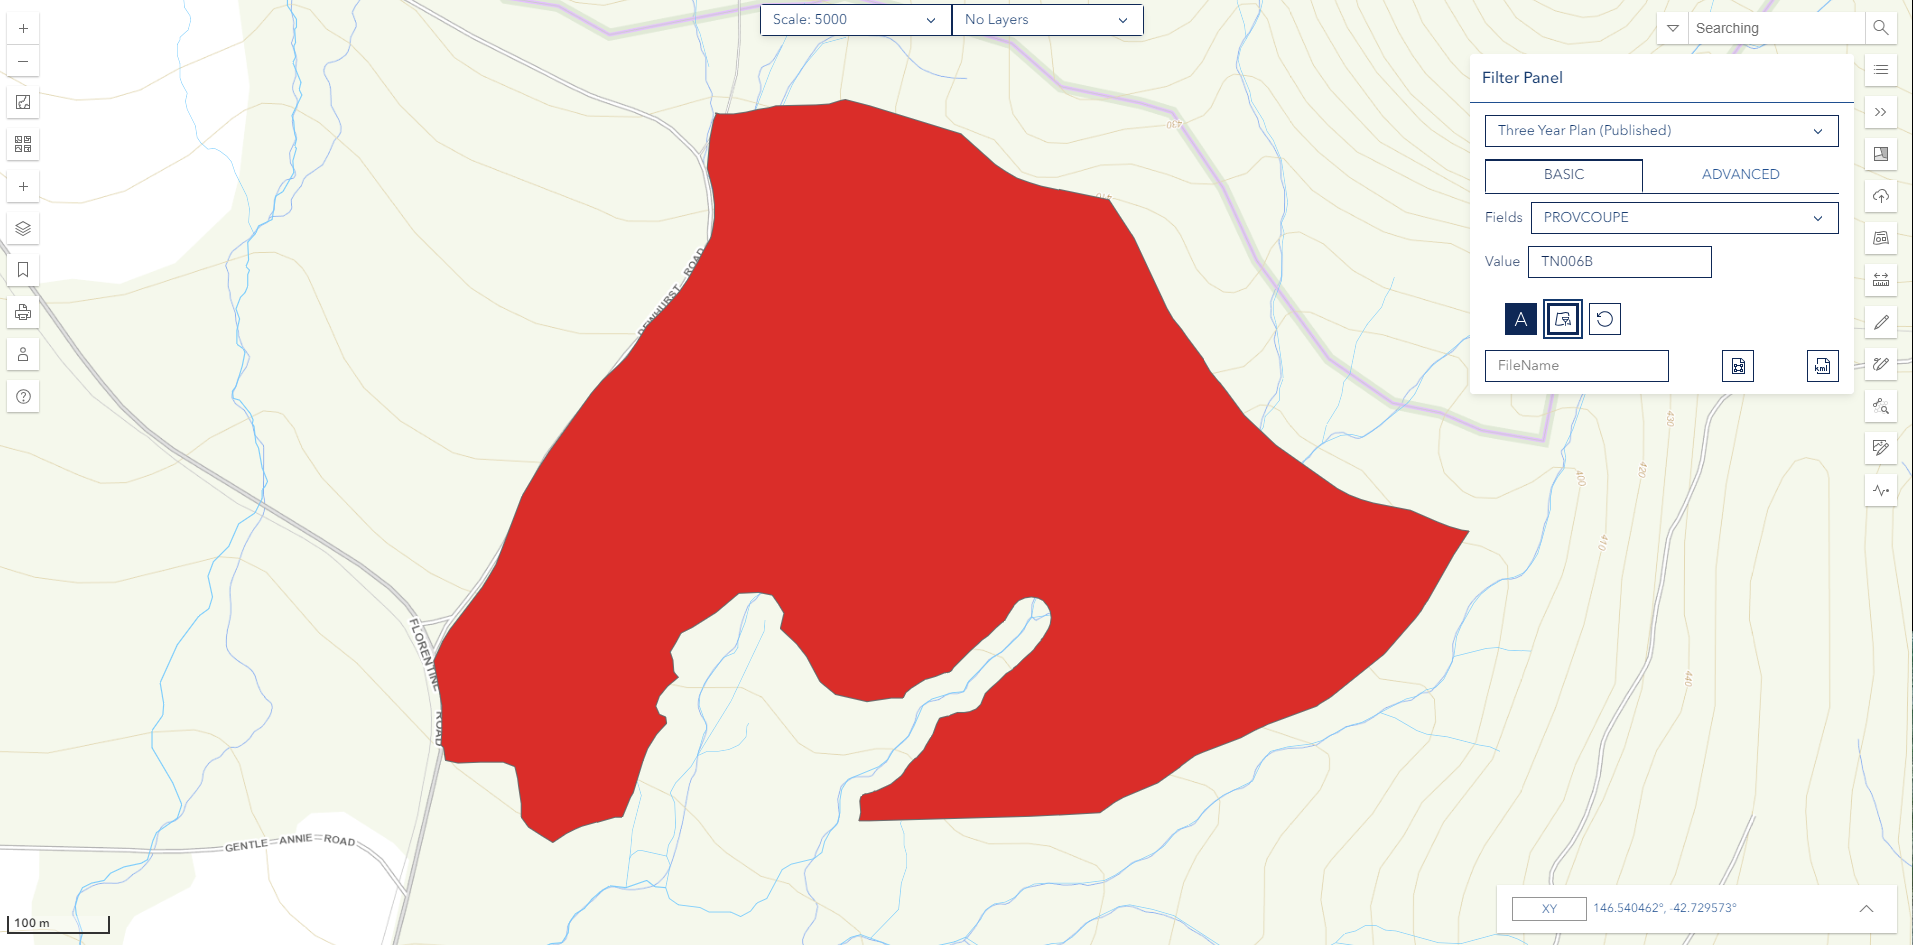
Step 4: Apply Filter
- Click the Filter button to apply the filter
- Wait for the results to load
- The map will update to show only matching features and automatically zoom to the filtered extent

Unique Values Browser
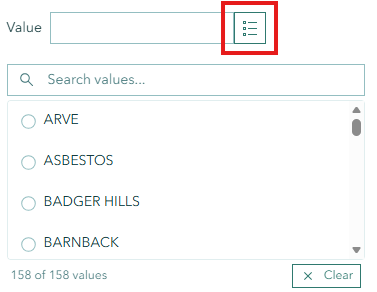
The Unique Values Browser helps you discover and select valid field values without typing:
- Select a layer and field first
- Click the list icon button next to the Value input
- The tool fetches all distinct values from the layer (with live progress indicator)
- Use the search box to filter the list as you type
- Click any value in the list to populate the Value input
- Use Show More to load additional values in batches
- Click Clear to dismiss the values list
Note
Unique values are cached for the current session. Switching to a different layer or field automatically clears the cache for that selection.
Basic Panel Action Buttons

| Button | Description |
|---|---|
| Aa (Case toggle) | Toggle case-insensitive matching for text searches |
| Refresh icon | Reload field selectors if dropdowns appear out of sync |
| Filter button | Apply the current filter criteria to the selected layer |
| Reset button | Clear the active filter and restore all features |
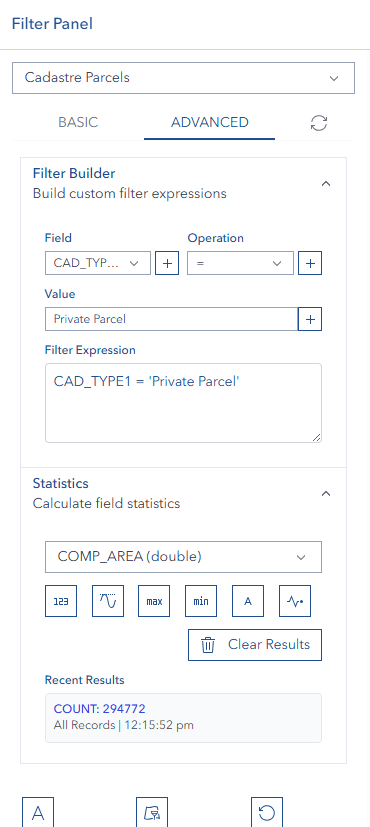
Advanced Panel
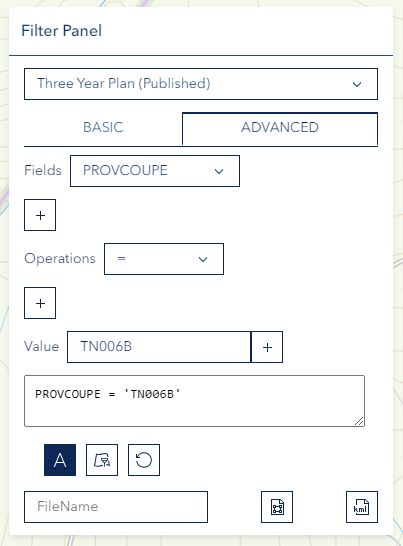
The Advanced Panel allows you to build SQL WHERE clause expressions using an interactive query builder.
Query Builder Controls
Field Row
- Select a field from the Field dropdown to reference in your expression
- Click the + button to insert the field name into the expression at the cursor position
Compare Row — Click any operator to insert it into the expression:
| Operator | Meaning |
|---|---|
= | Equal to |
<> | Not equal to |
< | Less than |
> | Greater than |
<= | Less than or equal |
>= | Greater than or equal |
Logic Row — Combine conditions:
AND— Both conditions must be trueOR— Either condition must be trueNOT— Negate a condition( )— Group conditions with parentheses
Special Row — Additional SQL keywords:
LIKE— Pattern matching (use%as wildcard)IN— Match a list of valuesBETWEEN— Match a range of valuesIS NULL— Match records with no value in the fieldNOT NULL— Match records that have a value in the field
Value Row
- Enter a value in the Value input field
- Click the + button to insert the value into the expression (automatically quoted for text fields)
- Click the list icon button to load and browse unique values for the selected field
Filter Expression Textarea
- Type or build your complete SQL WHERE clause expression in the text area
- Use
Ctrl+Enteras a keyboard shortcut to apply the filter without clicking the button - The expression supports up to 2,000 characters
Creating SQL Queries — Examples
Simple Equality:
sql
STATUS = 'Active'Numeric Range:
sql
AREA > 1000 AND AREA < 5000Text Pattern with Wildcard:
sql
NAME LIKE 'Forest%'Multiple Conditions with Grouping:
sql
(TYPE = 'Harvest' AND YEAR >= 2020) OR STATUS = 'Pending'Null Check:
sql
COMMENTS IS NULLTIP
For detailed SQL syntax help, visit the ArcGIS Query Builder Help.
Advanced Panel Action Buttons
| Button | Description |
|---|---|
| Aa (Case toggle) | Toggle case-insensitive matching for text values |
| Refresh icon | Reload field selectors if dropdowns appear out of sync |
| Filter button | Execute the SQL expression and zoom to matching results |
| Reset button | Clear the expression and restore all features |
Legend Panel
The Legend Panel enables filtering based on the layer's map symbology. It is only visible when the selected layer uses a unique-value renderer (i.e., features are styled by a specific field value such as species type, land use class, or status code).
Using the Legend Panel
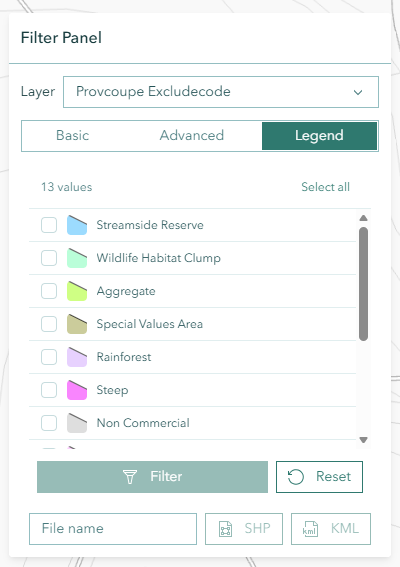
Step 1: Select a Layer with Symbology
- Choose a layer from the Layer dropdown
- If the layer uses a unique-value renderer, the Legend tab will appear in the filter mode selector
- Click Legend to switch to the Legend tab
Step 2: Select Symbology Values
- The panel displays all unique values from the renderer with their symbol previews
- Click any row to toggle its selection (a checkmark appears when selected)
- Use Select all to select every value at once
- Use Clear to deselect all values
- The selection counter at the top shows how many values are selected
Step 3: Apply or Reset
- Click Filter to apply the filter — only features matching the selected symbology values will be shown
- Click Reset to clear the selection and restore all features
Note
The Legend tab is automatically hidden if the selected layer does not have a unique-value renderer. If the tab disappears after switching layers, switch to Basic or Advanced mode to continue filtering.
Filter Editor Dialog
The Filter Editor is a larger, draggable and resizable pop-out workspace for building filters more comfortably than the compact side panel. Open it with the launch / pop-out button (brand-blue border) in the Filter Panel's action row. It is non-modal — the map stays interactive while it is open, so you can pick features or pan and zoom without closing it.
The dialog heading shows the active layer (e.g. Filter Editor — Forest Plots), and a Source Layer dropdown at the top lets you switch layers without leaving the dialog. It has three tabs — Visual Builder, SQL Editor, and Statistics & Export — sharing a common footer.
The footer is shared across all tabs:
| Button | Description |
|---|---|
| Cancel | Close the dialog (your built conditions are kept for next time) |
| Aa | Toggle case-insensitive matching (same as the panel's Case toggle) |
| Reset | Clear the active filter from the layer |
| Zoom | Toggle "zoom to results after filtering" (this preference is remembered) |
| Apply Filter | Apply the current tab's filter to the layer |
Tab 1 — Visual Builder
Build a query without writing SQL by adding conditions and nested groups:
- Match ALL / ANY — choose whether the conditions must all match (AND) or any match (OR)
- Add Condition — adds a row with three controls: a Field dropdown, an Operator dropdown (
=,≠,>,≥,<,≤,LIKE,NOT LIKE,IN,NOT IN,BETWEEN,IS NULL,NOT NULL), and a Value input - Load unique values — each condition row has a list button next to the value box that loads the distinct values for the selected field into a searchable dropdown, so you can pick a value instead of typing it (works for both top-level conditions and conditions inside nested groups)
- Add Group — adds a nested group with its own Match ALL/ANY toggle, so you can express logic like
(A AND B) OR (C AND D) - Generate SQL — converts the visual conditions into a SQL clause and drops it into the SQL Editor tab for review or fine-tuning
Value formats:
BETWEEN— entermin, max(two comma-separated values)IN/NOT IN— enter a comma-separated list, e.g.North, East, WestIS NULL/NOT NULL— the value box is disabled (no value needed)
Click Apply Filter and the builder's conditions are turned into SQL and applied to the layer.
INFO
Numeric comparisons are validated — a value that isn't a valid number (for a numeric field) is rejected rather than inserted into the query, protecting against malformed or unsafe input.
Tab 2 — SQL Editor
A full SQL WHERE clause workspace — the same engine as the panel's Advanced mode, but with more room:
- SQL Operators button rows — quick-insert Compare (
=,<>,<,>,<=,>=), Logic (AND,OR,NOT, and( )to wrap a selection in parentheses), and Special (LIKE,IN,BETWEEN,IS NULL,IS NOT NULL) operators at the cursor - Field dropdown + insert button — drops the selected field name into the expression
- Unique Values — pick a field, click Load Values, search, and click a value to insert it (with proper SQL quoting); use Load more for high-cardinality fields
- SQL Where Clause textarea — type or edit the expression directly
Destructive keywords (DROP, DELETE, UPDATE, etc.) are blocked and the expression is length-limited — the same protections as the Advanced tab.
Tab 3 — Statistics & Export
Two cards side by side:
- Statistics — pick a Numeric Field, then click Count / Sum / Average / Minimum / Maximum / Std Deviation. Results list under the buttons (clear them with the trash icon). Calculations respect the active filter.
- Export Data — when a filter has produced results, enter a File Name and export to Shapefile (SHP) or KML. If there are no filtered features yet, an info notice prompts you to apply a filter first. (As in the panel, export is unavailable for Map Image layers — use a Feature Layer.)
Notes & Behaviour
- Non-modal: the map remains clickable while the dialog is open
- Closing keeps your work: closing the dialog keeps the conditions you built, so reopening continues where you left off. Switching the source layer clears the builder (the old layer's fields may not exist on the new one).
- Shared state with the panel: the SQL Editor's clause is the same expression the panel's Advanced tab uses; Apply, Reset, Zoom, and the Case toggle behave identically
Statistics Functions
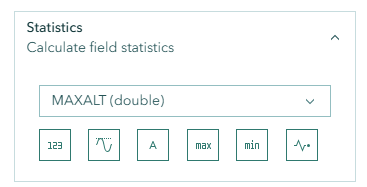
The Filter Tool includes powerful statistical analysis capabilities available in the Advanced Panel under the Statistics accordion section.
Accessing Statistics
- Switch to the Advanced tab
- Scroll to the bottom and expand the Statistics accordion section
- Select a numeric field from the Statistics Field dropdown (required for all operations except Count)
- Click the desired statistic button
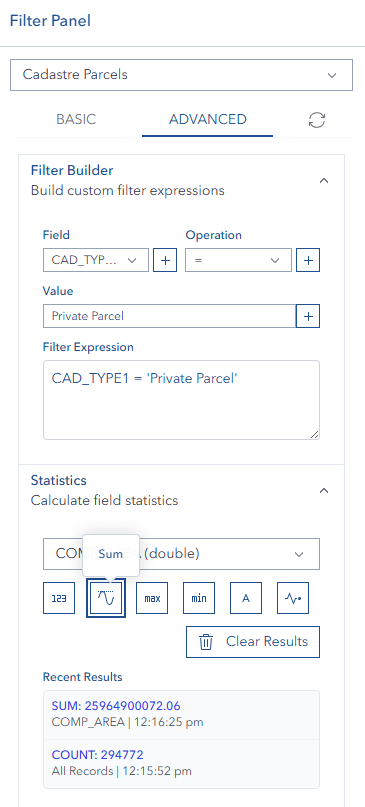
Available Statistics
| Button | Function | Field Required |
|---|---|---|
| Count | Count total number of records in the layer or filtered result | Any field (auto) |
| Sum | Calculate the total sum of all values in the selected field | Numeric field |
| Avg | Calculate the mean/average of values in the selected field | Numeric field |
| Max | Find the maximum value in the selected field | Numeric field |
| Min | Find the minimum value in the selected field | Numeric field |
| Stddev | Calculate the standard deviation of values in the selected field | Numeric field |
INFO
Only numeric fields (integer, double, single) are available in the Statistics Field dropdown for Sum, Avg, Max, Min, and Stddev. Count works with any field and uses the first available field automatically.
Statistics Features
Filter-Aware Calculations:
- Statistics respect any active filter expression in the text area or the Basic panel value
- Apply a filter first, then calculate statistics to analyze only the filtered subset of data
- This enables powerful targeted analysis without running a separate query
Recent Results Display:
- Calculated results appear in a compact list below the statistic buttons
- Each result shows the statistic type, field name, calculated value, and timestamp
- Results are shown in reverse chronological order (newest first)
- Click Clear Results to remove all displayed results
Statistics Examples
TIP
Use statistics to quickly analyze your data without opening external tools. Combine with filters for powerful data insights on specific subsets!
Exporting Results

The Export section appears at the bottom of the panel. Export buttons are only active after a successful filter operation returns results.
Export Process
Step 1: Apply a Filter
- Use the Basic, Advanced, or Legend tab to filter the layer
- Ensure the filter returns at least one matching feature
- The SHP and KML export buttons become active when results are available
Step 2: Set Filename (Optional)
- Enter a custom filename in the File name input field
- Use descriptive names for easy identification later
- Leave blank to use the filtered field value or layer name as the filename
Step 3: Choose Format and Export
- SHP — Standard Shapefile format for use in ArcGIS, QGIS, and other GIS applications
- KML — Google Earth format for viewing in Google Earth or other KML-compatible tools
Click the appropriate button and wait for the file to download automatically.
Export Notes
- Only features matching the current filter will be exported
- Always apply your filter before attempting to export
- Group layers can be filtered but cannot be exported — in the Legend tab, when a group layer is selected, a sublayer dropdown appears to let you choose which child layer's renderer to display. For export, select an individual sub-layer directly instead
- Sketch layers have special handling: system-injected USERNAME filters are automatically stripped so you only see your own features
- KML exports include the feature name attribute only; SHP exports preserve all layer attributes
- Large datasets may take longer to process
Tips & Troubleshooting
Common Issues
| Problem | Solution |
|---|---|
| No layers in dropdown | Make sure target layers are visible on the map; click the dropdown to refresh |
| Filter not working | Check field names, data type, and value formatting |
| Export buttons are disabled | Apply a filter first — export requires active filtered results |
| Export fails for Group layer | Use an individual sub-layer instead of a group layer for export |
| Query errors | Review SQL syntax and field names in the expression textarea |
| Slow unique values loading | Large layers with many unique values may take time; a progress indicator shows count |
| Empty unique values list | The selected field may contain no data or the layer may not support distinct queries |
| Legend tab not visible | The selected layer must use a unique-value renderer |
| Statistics error | Ensure a numeric field is selected for Sum/Avg/Min/Max/Stddev |
| No numeric fields in stats | The layer may only contain text fields; use Count instead |
| Field selectors out of sync | Click the Refresh icon to reload field dropdowns |
Best Practices
For Basic Filtering:
- Use the Unique Values Browser (list icon) to discover valid values before typing
- Toggle case-insensitive matching (Aa button) if text searches return no results
- Exact matches are used by default — use the Advanced panel for partial matches
For Advanced Filtering:
- Use the query builder buttons to reduce typing errors in expressions
- Load unique values for the selected field to insert precise values with the + button
- Use
Ctrl+Enterto quickly apply expressions while editing - Test simple conditions before building complex multi-part expressions
For Legend Filtering:
- Use Select all then deselect individual values to exclude specific categories
- Combine with Basic or Advanced filtering by applying a legend filter first, then switching tabs
For Exporting:
- Use descriptive filenames for easy identification after download
- Choose SHP when you need full attribute preservation for GIS workflows
- Choose KML when sharing data for viewing in Google Earth
For Statistics:
- Apply a filter first to calculate statistics on a specific data subset
- Use Count for a quick feature count — no numeric field selection required
- Keep the results panel visible to compare multiple calculations side by side
Field Types and Formatting
Text Fields:
- In Advanced mode, quote string values with single quotes:
'Forest' - Use LIKE with
%for partial matches:NAME LIKE 'Forest%' - Toggle case-ignore (Aa) for case-insensitive matching in Basic mode
Numeric Fields:
- No quotes needed in expressions:
AREA > 1000orVALUE = 25.5 - Use comparison operators for range queries
Date Fields:
- Quote date values:
DATE_FIELD = '2023-01-01' - Use BETWEEN for date ranges:
SURVEY_DATE BETWEEN '2020-01-01' AND '2023-12-31'
Video Tutorials
Basic Filter Function
Advanced Filter Function
Export Geometry Function
See Also
- Feature Table - View and manage filtered feature attributes in tabular format
- Area Summary Tool - Generate area calculations using geometry intersection analysis
- Layer Panel - Control layer visibility and access layer-level filtering