Appearance
Line of Sight
Overview
The Line of Sight tool calculates the ground area within line of sight of a single observer point — for example, an eagle nest. You place a "nest" point, set how high the observer is above the ground and how far to look, and the tool returns the visible area as a polygon on the map.
The calculation runs as an asynchronous geoprocessing (GP) job on the ArcGIS Server using a digital elevation model (DEM), so you can keep working while it processes.
Coordinate System
Nest coordinates are entered and reported in EPSG:28355 (GDA94 / MGA Zone 55), in metres. When you pick a point on the map or select one from a saved layer, Horizon converts it to this system for you automatically.
Key Features
- Three Ways to Set the Observer Point: Pick a location directly on the map, select from one of your saved point layers, or type easting/northing coordinates
- Adjustable Analysis Parameters: Set the observer height above ground, the analysis radius, and the cell size (detail level)
- Asynchronous Processing: Submit the job and monitor progress with real-time status updates
- Job Message Log: View full server processing messages in a draggable dialog
- Visible-Area Visualisation: The result is added to the map as a "Line of Sight" layer with padded zoom
- Customisable Colours: The nest marker and the visible-area result use your Graphics Styles settings, so you can change their colours to suit your map
- Contextual Guidance: Hint messages appear when the pick or select tool is active, guiding you through each step
How to Use the Line of Sight Tool
Accessing the Tool
- Navigate to the Report Tools panel in the right sidebar
- Select Line of Sight from the report tools dropdown
- The tool panel opens showing the nest point controls, analysis parameters, and action buttons
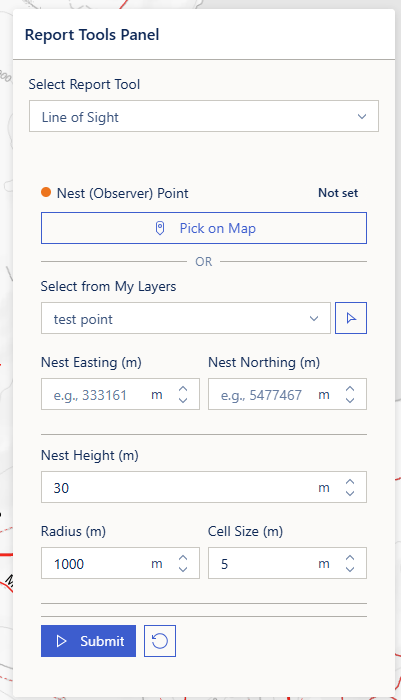
Step 1: Set the Nest (Observer) Point
The nest point is the location whose visibility you want to analyse. A status chip beside the Nest (Observer) Point heading shows Set (once a point is defined) or Not set. There are three ways to set it:
Option A — Pick on Map
- Click the Pick on Map button (pin icon)
- A hint appears: "Click a location on the map to set the nest point."
- Click the desired location on the map
- The easting and northing fields fill in automatically, and a nest marker appears on the map
Click Pick on Map again to cancel before clicking.
Option B — Select from My Layers
If you have saved point layers in My Layers, you can use a point from one of them:
- Choose a layer from the Select from My Layers dropdown (only your saved point and multipoint layers are listed). Click the dropdown to refresh the list.
- Click the select button (cursor icon) beside the dropdown
- If the layer has a single point, it is used automatically and the map zooms to it
- If the layer has several points, the map zooms to show them and a hint appears: "This layer has multiple points — click the one you want on the map." Click near the point you want, and the nearest one is used
Option C — Type Coordinates
Enter the Nest Easting and Nest Northing directly in the input fields (in metres, EPSG:28355). For example, easting 333161, northing 5477467.
Once a nest point is set, its marker appears on the map, the easting and northing fields are filled in, and the status chip reads Set.
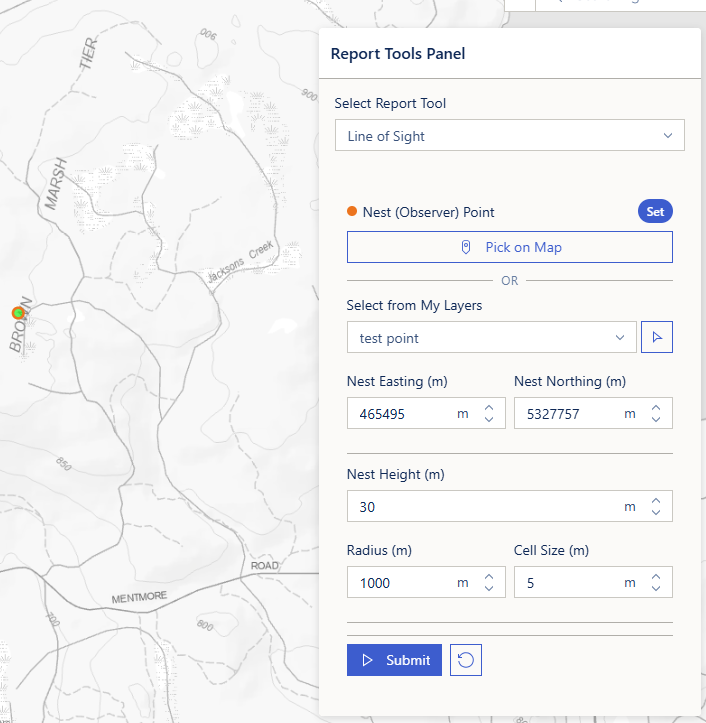
Step 2: Set the Analysis Parameters
| Parameter | Default | Range | Description |
|---|---|---|---|
| Nest Height (m) | 30 | 1–500 | How high the observer is above the ground at the nest point |
| Radius (m) | 1000 | 50–20,000 | How far from the nest to analyse — the maximum sight distance |
| Cell Size (m) | 5 | 1–50 | The analysis detail. A smaller value gives finer detail but takes longer; a larger value is faster but coarser |
Choosing a Cell Size
The default 5 m is a good balance of detail and speed. Lower it (toward 1–2 m) only when you need very fine detail, and raise it for a faster, coarser result over a large radius.
Step 3: Submit the Analysis
- Make sure a nest point is set (the status chip shows Set) and the parameters are within their allowed ranges
- Click the Submit button (play icon)
- The button shows a loading indicator while the job processes
- Real-time status messages appear below the action buttons
Monitoring Job Progress
While the job is running:
- A progress indicator shows the current status with user-friendly labels (e.g., "Submitted", "Processing")
- The latest server message is displayed inline
- A message count badge appears — click it to open the full Job Messages dialog
- A Cancel button appears to abort the job if needed
Job Messages Dialog
Click the message count badge to open the Job Messages dialog:
- Draggable and resizable — position it anywhere on screen
- Non-modal — you can continue interacting with the map while viewing messages
- Messages are displayed in a numbered, scrollable list with monospace font
- Error messages are highlighted in red for easy identification
- Auto-scrolls to the latest message as they arrive during processing
- The dialog heading updates to reflect the job state (Processing, Completed, or Failed)
The dialog can also be opened after the job completes to review the full processing log.
Understanding Your Results
When the job completes successfully, the visible-area polygon is added to the map showing all the ground within line of sight of the nest point. The map automatically zooms to the result with comfortable padding around it.
The result appears in the Layer Panel inside a "Line of Sight" group layer, alongside the nest marker, and can be toggled on/off. A success banner confirms the result has been added to the map.
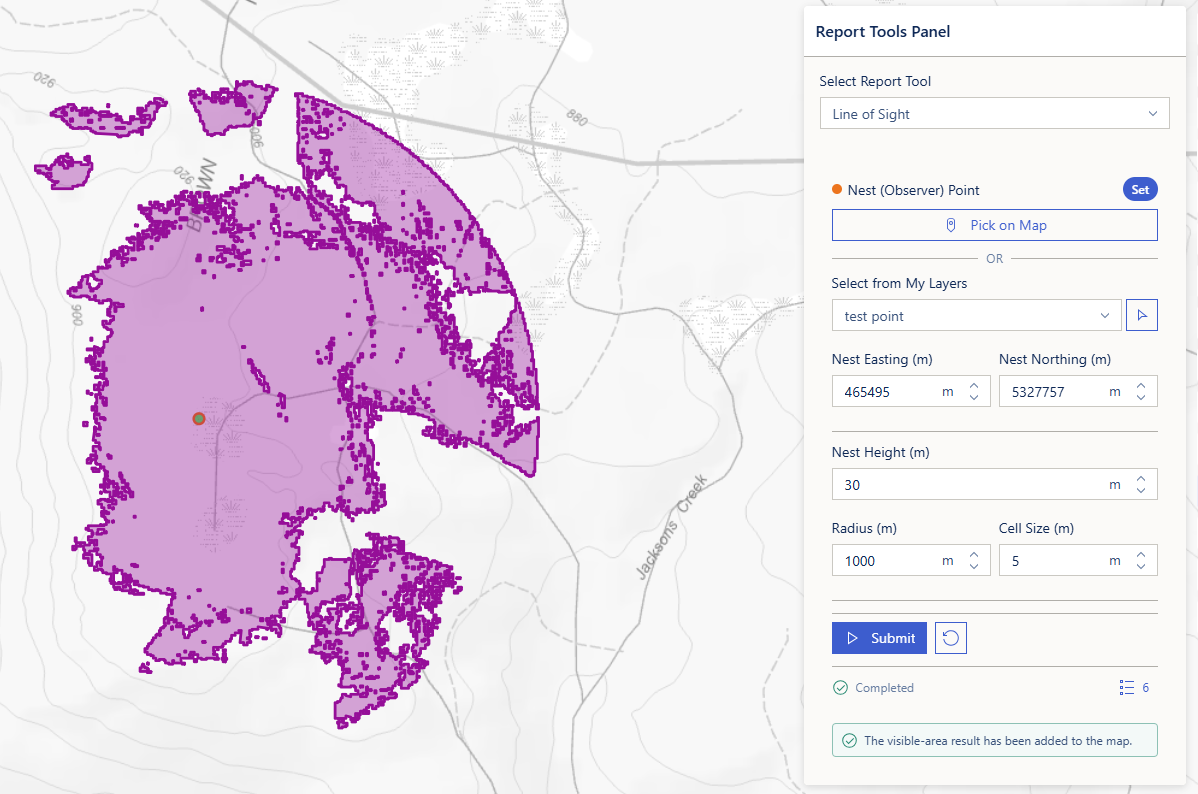
Customising the Colours
The nest marker uses your Target graphics style, and the visible-area result uses the Line of Sight graphics style. You can change both in System → Graphics Styles (the new colours apply the next time you place a point or run the analysis).
Resetting the Tool
Click the Reset button (reset icon) to:
- Clear the nest point and marker from the map
- Reset the height, radius, and cell size to their defaults (30 m / 1000 m / 5 m)
- Remove the visible-area result layer
- Clear the job status and messages
Worked Example
Visibility from an Eagle Nest
- Select Line of Sight from the Report Tools dropdown
- Click Pick on Map and click the nest location on the map — the easting/northing fields fill in and a marker appears
- Leave the Nest Height at 30 m
- Set the Radius to 1500 m to look a little further than the default
- Leave the Cell Size at 5 m
- Click Submit
- Monitor progress via the inline status, or open the Job Messages dialog for full detail
- Wait for the job to complete (usually a few seconds)
- Inspect the visible-area polygon on the map (automatically zoomed with padding) — everything inside it is within line of sight of the nest
Video Tutorial
Watch this guide on running a Line of Sight analysis:
Troubleshooting
| Issue | Solution |
|---|---|
| Submit button is disabled | Wait for a running job to complete |
| "Nest Point Required" error | Set a nest point first — pick on the map, select from a saved layer, or type the easting and northing |
| "Invalid Parameters" error | Check the nest height, radius, and cell size are within their allowed ranges (see the table in Step 2) |
| "Nest is outside the DEM extent" message | The point falls outside the elevation data coverage. Confirm the location is within Tasmania's data coverage and the coordinates are correct |
| "No visible area produced" message | The nest may see no ground within the radius. Try increasing the nest height or radius, or lowering the cell size |
| No layers in the Select from My Layers dropdown | You have no saved point or multipoint layers. Save a point layer in My Layers first, then click the dropdown to refresh |
| "No Points Found" when selecting a layer | The chosen saved layer has no point features |
| Job fails with an error | Open the Job Messages dialog to read the server error. Common causes include an out-of-coverage nest point or a temporary server connectivity issue |
| Result layer not visible | Check the Layer Panel — the "Line of Sight" group may be toggled off |
| Cannot cancel a job | The Cancel button only appears while a job is actively running |
Frequently Asked Questions
Q: What does "line of sight" mean here? A: It is the ground area that can be seen from the observer point, taking the terrain into account. Hills, ridges, and valleys block the view, so the visible area follows the shape of the landscape — it is not just a circle around the nest.
Q: What is the "nest height" for? A: It is how high the observer sits above the ground at the nest point (for example, the height of an eagle nest in a tree). A taller observer can see over more obstructions, so increasing the height generally increases the visible area.
Q: Why did I get an empty or very small result? A: The nest may be in a low or enclosed spot where little ground is visible within the radius. Try a greater nest height or radius, or a smaller cell size for finer detail.
Q: How accurate is the result? A: The analysis uses a 2 m digital elevation model. The cell size you choose controls the detail of the output — smaller cells give crisper edges. The result cannot be finer than the underlying elevation data.
Q: Can I change the colour of the visible area or the nest marker? A: Yes. The visible-area result uses the Line of Sight graphics style and the nest marker uses the Target style — both are editable in System → Graphics Styles.
Q: How long does it take? A: Usually only a few seconds, because the analysis is focused on a small window around the nest. A very large radius or a very small cell size will take a little longer.
Q: Can I save or export the result? A: The visible area is added to the map as a graphics layer and can be viewed in the Layer Panel. It is not directly exportable — take a screenshot or record the result for reporting.
Q: How do I view all the server messages from a job? A: Click the message count badge next to the status line to open the Job Messages dialog. This shows all messages in a scrollable list, and can be opened during or after the job completes.