Appearance
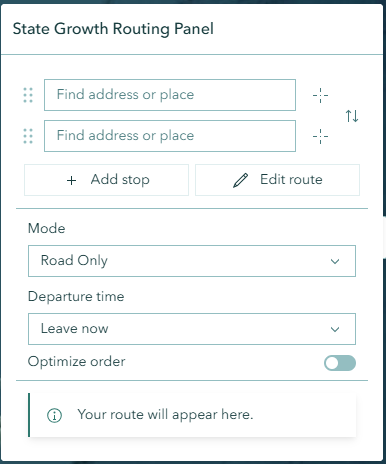
State Growth Routing Tool
Overview
The State Growth Routing Tool provides route planning and turn-by-turn directions using the State Growth Tasmania Network Analysis service. It calculates routes between locations across multiple transport network modes, displaying the route on the map with distance and estimated travel duration. The tool supports up to 10 stops per route, barriers to block sections of the network, and exporting the calculated route as SHP or KML.
This tool uses the ArcGIS Directions component connected to the State Growth Tasmania routing service at datat.stategrowth.tas.gov.au. It is separate from the Road Network Tool, which is designed for forestry-specific provcoupe-to-destination analysis.
Features
- Route Calculation: Calculate routes between locations using the State Growth Tasmania network
- Multiple Travel Modes: Choose from road, rail, and forestry network combinations
- Turn-by-Turn Directions: View step-by-step directions for the calculated route
- Multiple Stops: Add up to 10 stops along the route, with drag-to-reorder support
- Departure Time: Set departure time for time-aware routing
- Barriers: Place point, polyline, or polygon barriers to block sections of the network
- Optimize Order: Automatically reorder stops for the most efficient route
- Distance and Duration: View total route distance in kilometres and estimated travel time
- Route Visualization: The calculated route is displayed as a polyline on the map
- Route Export: Export the route geometry as SHP or KML via the layer context menu
Using the Tool
Accessing the Panel

- Click the Advanced Routing button (
driving-distanceicon) in the toolbar - The State Growth Routing Panel opens
Planning a Route
- Enter a starting location in the origin field — type an address or click a location on the map
- Enter a destination in the destination field
- The route is calculated automatically once both locations are provided
- The route appears on the map and the panel displays the total duration and distance (e.g., "1 min (2.55 km)")
Use the swap button (↕) between the origin and destination fields to reverse the route direction.
Adding Stops
Click + Add stop to insert intermediate stops between the origin and destination. Up to 10 stops can be added per route. Stops can be reordered by dragging the handle (⠿) on the left of each stop field.
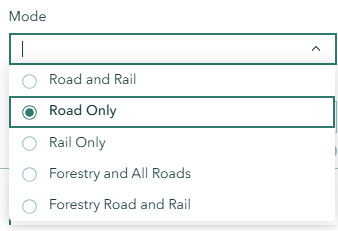
Travel Mode
The Mode dropdown selects which transport networks to use for routing:
| Mode | Description |
|---|---|
| Road and Rail | Routes across both road and rail networks |
| Road Only | Routes using roads only |
| Rail Only | Routes using rail network only |
| Forestry and All Roads | Routes using forestry roads in addition to all public roads |
| Forestry Road and Rail | Routes using forestry roads combined with the rail network |
Departure Time
The Departure time dropdown controls time-aware routing:
| Option | Description |
|---|---|
| Leave now | Calculate the route based on current traffic and conditions |
| Depart at | Specify a departure date and time for the route |
| Time unspecified | Calculate the route without time-based constraints |
Optimize Order
When multiple stops are added, enable the Optimize order toggle to automatically reorder the stops for the most efficient route. This minimises total travel distance across all stops.
Edit Route
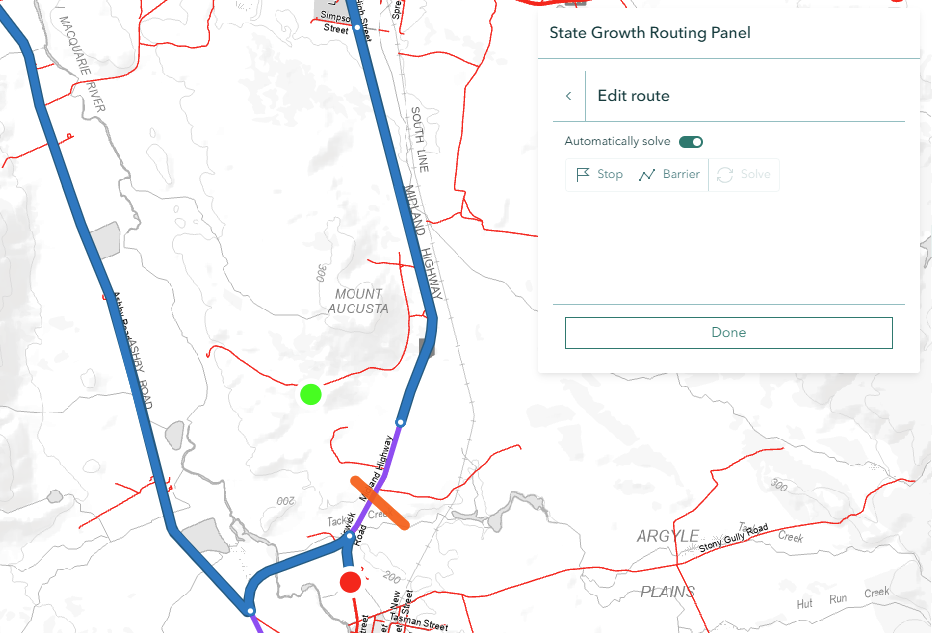
Click Edit route to enter the route editing mode, which provides advanced controls:
- Automatically solve — Toggle on to recalculate the route automatically as changes are made. Toggle off to make multiple edits before solving.
- Stop — Click on the map to place additional stops directly on the route
- Barrier — Click on the map to place barriers that block sections of the network. The route will be recalculated to avoid the barrier.
- Solve — Manually trigger route calculation (when automatic solve is off)
Click Done to exit the edit route mode.
Route Results
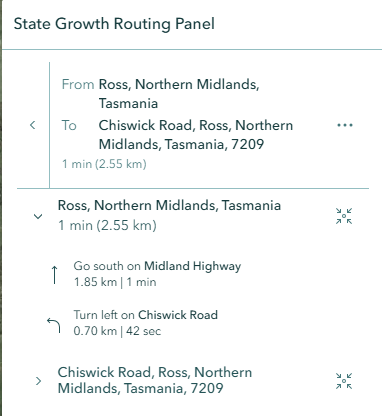
After a route is calculated, the panel displays:
- Total duration and distance (e.g., "1 min (2.55 km)")
- Turn-by-turn directions — expand the result to view step-by-step instructions
The route polyline is drawn on the map with stops marked. Each direction segment includes distance and duration attributes.
Exporting a Route

After calculating a route, the route layer can be exported from the layer context menu:
- Locate the Route Layer in the Layer Panel
- Open the layer context menu
- Select Export Route as SHP or Export Route as KML
- The file downloads with the filename
route_directions_{date}.shpor.kml
The exported file includes direction line segments with the following attributes:
| Attribute | Description |
|---|---|
| RtClass | Direction line class |
| SegmentIdx | Segment index number |
| DistanceM | Segment distance in metres |
| DurationM | Segment duration in minutes |
| LineClass | Direction line type |
| FeatureCat | Feature category |
Troubleshooting
| Issue | Solution |
|---|---|
| Panel fails to open | The State Growth routing service may be unavailable. Try again later or contact support. |
| No route calculated | Ensure both origin and destination are valid locations on the road network. Remote or off-road locations may not be routable. |
| Export shows "No direction lines found" | Calculate a route first before attempting to export. The route layer must contain direction lines. |
| Route not visible on map | Check the Route Layer visibility in the Layer Panel. Closing the panel removes the route layer from the map. |
Video Tutorial
Watch this guide on using the State Growth Routing Tool:
See Also
- Road Network Tool - Forestry-specific route distance calculation from provcoupe to destinations
- Measure Tool - Manual distance and area measurement tools