Appearance
AI Segmentation
Overview
The AI Segmentation tool traces object outlines from imagery for you. You draw a box around an area of the map, then click an object inside it — a building, a dam, a clearing — and the tool returns that object's outline as a polygon. It is the idea behind QGIS's "Magic Wand", but backed by an AI segmentation model, so it follows real object edges on textured aerial and satellite imagery instead of a simple colour flood-fill.
You keep clicking to capture more objects, refine each outline if needed, and then export the results (SHP / KML) or save them as one of your My Layers.
Works best on imagery
The tool reads whatever pixels are on the screen inside your box, so it works best over a satellite or aerial imagery basemap (or a visible imagery layer). On a plain topographic or vector basemap there are no object edges for the model to find.
When the tool is available
AI Segmentation only appears in the Report Tools dropdown when a segmentation service is configured for your deployment. If you do not see it, the service has not been enabled — contact your administrator.
How It Works
Understanding the flow makes the rest of the tool obvious:
- Select an area — you draw a box. The tool captures that region of the map and sends it to the AI service once (this "encoding" step takes a few seconds — it is the slow part).
- Click objects — each click inside the encoded area is answered almost instantly, because it reuses that one encoding. A blue highlighted outline (the preview) appears for the object you clicked.
- Refine (optional) — nudge the preview with modifier-clicks until it fits.
- Add object — commit the preview; it changes to your result colour and is counted.
- Repeat for more objects, then export or save them.
Because the slow encoding is done once per area, selecting many objects within one box is fast.
Key Features
- Point-and-click object tracing: click an object to get its outline as a polygon
- Refine outlines: add or remove parts of a selection with modifier-clicks, or undo the last click
- Box-drag selection: drag a tight box around an object as a stronger hint (ideal for roofs)
- Edit tool: reshape an outline the model got slightly wrong, or move/resize the analysis area
- Outline styles: choose Exact, Smooth (default), or Box-fitted outlines
- Find by text (where supported): type a phrase like "house" to select every match in the area at once
- Export & save: download results as SHP or KML, or save them as a My Layer (one feature per object)
- Your colours: results and the capture box follow your Graphics Styles settings
- Results persist: your outlines survive switching to another Report Tool and back
How to Use the AI Segmentation Tool
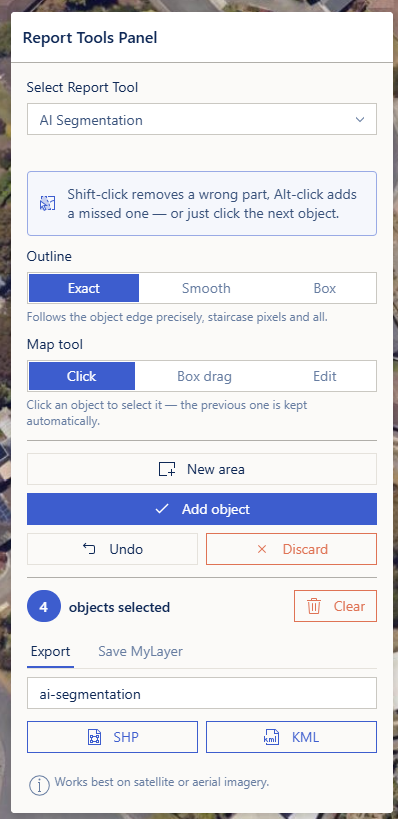
Accessing the Tool
- Navigate to the Report Tools panel in the right sidebar
- Select AI Segmentation from the report tools dropdown
- The tool panel opens with the settings, a Select area button, and a live status line at the top
The status notice at the top of the panel is your main guide — it always tells you the next thing to do.
Step 1: Select an Area
- Click Select area
- Drag a box on the map around the area that contains the objects you want to trace, then release
- The tool captures that region and encodes it — the status reads "Capturing and encoding the selected area…" for a few seconds
- When it is ready, a toast confirms Analysis Area Ready and the box is drawn with a dashed outline
Keep the box a sensible size
The captured region is limited to roughly a 2000 × 2000 pixel area of the screen. If your box is too large you will be asked to draw a smaller one. Zoom in a little and select a tighter area if this happens.
Map rotation and coordinate system
AI Segmentation is not supported while the map is rotated — reset the rotation first. The map must also be in a standard spatial reference (it normally is).
Step 2: Select Objects
With an area encoded, the status reads "Click an object inside the dashed area."
- Click an object inside the dashed box
- A blue outline (the preview) appears, tracing the object the model found
- Refine it if needed (see below), then click Add object to keep it
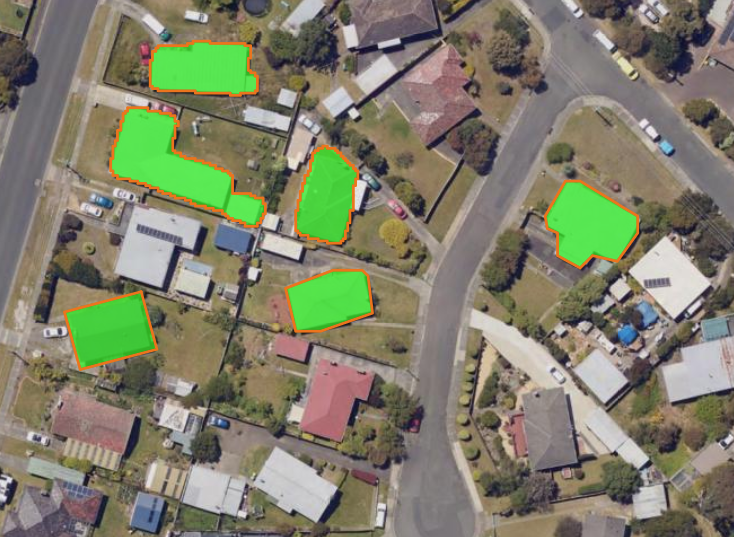
Each committed object changes to your result colour and the counter at the bottom of the panel goes up. To select another object, simply click it — the finished preview is kept automatically and a new one begins.
Refining a Selection
While a blue preview is showing, you can correct it without starting over:
| Action | Effect |
|---|---|
| Shift + click | Remove a part the model included by mistake |
| Alt + click | Add a part the model missed |
| Undo button | Remove your last refinement click |
| Discard button | Throw away the current in-progress object entirely |
Each refinement click re-runs the trace with all your hints combined, so the outline visibly improves click by click. You can add up to 64 refinement points to one object.
If a click finds nothing
If clicking returns nothing, the status suggests clicking closer to the centre of the object. Very small or very low-contrast objects are the hardest for the model.
Step 3: Export or Save Your Results
Once you have at least one object (a finished blue preview counts too — it is folded in automatically), a results section appears with a count, a Clear button, and an Export / Save MyLayer switcher.
Export tab
- Optionally type a file name (defaults to
ai-segmentation) - Click SHP or KML to download the objects in that format
Save MyLayer tab
- Type a name for the layer
- Click Save
Saving creates one feature per object, so they stay individually selectable in other tools (Area Summary, Print, Map Composer). A name that already exists as one of your polygon layers is refused rather than overwritten — choose a different name.
Settings
The settings sit at the top of the panel. Each has a short hint line beneath it explaining the selected option.
Outline
How the returned outline is post-processed. This applies to the next object you select (existing results are not re-shaped).
| Option | Best for |
|---|---|
| Exact | Follows the object edge precisely, including the per-pixel staircase — when you want the raw model output |
| Smooth (default) | Cleans up jagged edges and small holes — the best fit for most features |
| Box | Fits a tight rectangle around the object — ideal for roofs and other rectangular features |
Map tool
How you pick objects out of the encoded area.
| Option | What it does |
|---|---|
| Click (default) | Click an object to select it; the previous one is kept automatically |
| Box drag | Drag a tight box around one object — a stronger hint than a single click, ideal for roofs. The tool re-arms after each box, so consecutive drags select consecutive objects |
| Edit | Click an outline to reshape it (drag the handles; Delete removes it), or click the dashed analysis area to move or resize it |
Editing the analysis area re-captures it
In Edit mode, moving or resizing the dashed capture box re-encodes that new region — which clears the objects you had already committed, because they belonged to the old region. Finish and export your objects before moving the box, or leave the box where it is.
Model (only when more than one is available)
Some deployments offer more than one AI model. When they do, a Model control appears. The choices, their names, and their descriptions come from the service itself. Typically:
- Default — the standard model, available to everyone
- SAM 3 — a higher-capability model (and the one that enables Find by text), available to GIS administrators
Switching the model applies to your next area — it does not re-encode the current one. If you change it mid-area, the status tells you to press New area to switch now.
Find by text (only when the model supports it)
When the active model supports text prompts (SAM 3), a Find by text field appears. Type a short English noun — for example house, roof, or car — and press Find all (or Enter). Instead of one object per click, this selects every matching object in the area at once. You need an encoded area first, and the phrase is limited to 64 characters.
Colours and Layers
The tool adds up to three layers to your map:
- AI Segmentation Area — the dashed capture box (visible in the Layer Panel)
- AI Segmentation Results — your committed objects (visible in the Layer Panel)
- A preview layer — the blue in-progress outline (hidden from the Layer Panel; it is replaced on every click)
Colours follow your Graphics Styles (System → Graphics Styles):
- Committed objects are filled in your Target style
- The in-progress preview is filled in your Refer style (blue by default), so "not committed yet" is obvious at a glance
- The capture box is a dashed border only — it marks a region under analysis, not a result, so it is never filled
Your results are kept when you switch tools
The Results layer (and any edits you made with the Edit tool) stays on the map if you switch to a different Report Tool and come back. The capture box and preview are cleared when you close the tool, because their area can no longer be clicked. Use Clear, or start a New area, to remove committed results.
Buttons Reference
| Button | Action |
|---|---|
| Select area / New area | Draw a box to capture an area. Once an area exists, the same button becomes New area — it discards the current area, results, and session and starts over |
| Add object | Keep the highlighted (blue) preview as a finished object |
| Undo | Remove your last refinement click |
| Discard | Discard the object currently being refined |
| Find all | Find every match for the typed phrase (text-capable models only) |
| Clear | Remove all selected objects from the map |
| SHP / KML | Download the selected objects in that format |
| Save | Save the selected objects as one of your My Layers |
Worked Example
Tracing a Cluster of Buildings
- Switch the basemap to aerial imagery and zoom to the buildings
- Select AI Segmentation from the Report Tools dropdown
- Leave Outline on Smooth and Map tool on Click
- Click Select area and drag a box around the cluster
- Wait a few seconds for Analysis Area Ready
- Click the first building — a blue outline appears. If a corner is missing, Alt-click it to add that part; if it grabbed the neighbouring driveway, Shift-click the driveway to remove it
- Click Add object — the outline turns to your result colour and the count reads 1
- Click each remaining building in turn (each new click keeps the previous one automatically), pressing Add object for each
- On the Save MyLayer tab, type a name and click Save — each building is saved as its own polygon feature
Video Tutorials
Get area to Analyst
Troubleshooting
| Issue | Solution |
|---|---|
| I don't see AI Segmentation in the dropdown | The segmentation service is not configured for your deployment — contact your administrator |
| "AI Segmentation isn't supported while the map is rotated" | Reset the map rotation to north-up, then try again |
| "Area Too Large" when I draw the box | The box covers too much of the screen — zoom in and draw a smaller, tighter area |
| Clicking an object finds nothing | Click closer to the centre of the object; very small or low-contrast objects are hard to detect. Confirm you are clicking inside the dashed box |
| "Select an object first — then Shift-click removes a part…" | Shift/Alt-click refine the current object — start one with a plain click first |
| "Point limit reached" | You have added the maximum refinement points to one object — click Add object to keep it, or Discard and start again |
| "This area's session has expired" | The encoded area has timed out on the server. Click New area and draw it again |
| "Too many segmentation requests" | The service is rate-limited — wait a few moments, then try again |
| "The AI segmentation service isn't available right now" | The service is down or unreachable. Try again later, or contact your administrator if it persists |
| The SAM 3 model isn't responding | Switch Model back to Default, or try again once the SAM 3 service is running |
| My results disappeared after I moved the analysis area | Moving or resizing the dashed box in Edit mode re-captures the region and clears prior objects. Export or save before moving the box |
| "Name Already Exists" when saving | You already have a polygon My Layer with that name — choose a different one |
| Nothing exports / "Nothing to Save" | Select at least one object first (a finished blue preview counts — it is folded in on export/save) |
Frequently Asked Questions
Q: What kind of imagery does it need? A: It reads the pixels currently on screen inside your box, so it works best on satellite or aerial imagery. On a plain topographic or vector basemap there are no object edges for the model to trace.
Q: Why does selecting the area take a few seconds, but clicking objects is instant? A: The slow step is "encoding" the captured region, which the tool does once per area. Every click after that reuses that encoding, so selecting many objects inside one box is fast.
Q: What's the difference between Shift-click and Alt-click? A: They refine the object you are currently tracing. Shift-click removes a part the model included by mistake; Alt-click adds a part it missed. A plain click (no modifier) starts a new object and keeps the current one.
Q: Which outline style should I use? A: Smooth suits most features. Use Exact when you want the raw model output with every pixel edge, and Box for rectangular features like roofs.
Q: What is "Find by text"? A: On models that support it (SAM 3), you type a noun like house and it selects every matching object in the area at once, instead of one per click. If you don't see the field, your active model doesn't support text prompts.
Q: Why can't I choose the SAM 3 model? A: SAM 3 runs on more expensive hardware and is offered to GIS administrators. If the Model control doesn't appear at all, only one model is configured for your deployment.
Q: Can I fix an outline the model got slightly wrong? A: Yes. Switch Map tool to Edit, click the outline, and drag its handles to reshape it. In the same mode, Delete removes the outline under edit.
Q: How do I export the results? A: Once you have at least one object, use the Export tab to download SHP or KML, or the Save MyLayer tab to save them as one of your My Layers (one feature per object).
Q: Do my results survive switching to another tool? A: The committed Results layer stays on the map when you switch Report Tools and come back. It is cleared when you press Clear or start a New area. The dashed capture box and the in-progress preview are removed when you close the tool.