Appearance
Cart Route Editor Tool
Table of Contents
- Overview
- Quick Reference
- Getting Started
- Cart Route Information
- Geometry Types and Styles
- Drawing and Editing Operations
- Saving and Managing Cart Routes
- Print Cart Routes Map and Reports
- Troubleshooting
- Video Tutorials
Overview
Note: This documentation is maintained for reference and for environments where the Cart Route Editor is enabled.
The Cart Route Editor Tool is a specialized transportation planning and route management system designed for comprehensive cart route creation, documentation, and analysis. This advanced tool integrates sophisticated geometric editing capabilities with detailed route information management, supporting both point and line geometries for complete route planning, hazard documentation, communication channel assignment, and comprehensive route analysis with integrated mapping and reporting capabilities for professional transportation planning workflows.
Quick Reference
For experienced users who need a quick reminder of the workflow:
- Open the Cart Route Editor from the toolbar.
- Create or select a cart route name in the information panel.
- Use point and line tools to draw route elements on the map.
- Save your route information and geometry.
- Generate maps and reports as needed.
Complete Workflow
Follow these steps to create and manage cart routes:
- Create new cart route information.
- Select a cart route name from the dropdown.
- Draw point or line geometries on the map.
- Select the existing cart route name in the panel for printing cart route maps and reports.
- Print cart route maps and reports.
Getting Started
- Click the Cart Route Editor icon in the toolbar.
- The tool will initialize and load existing cart route layers.
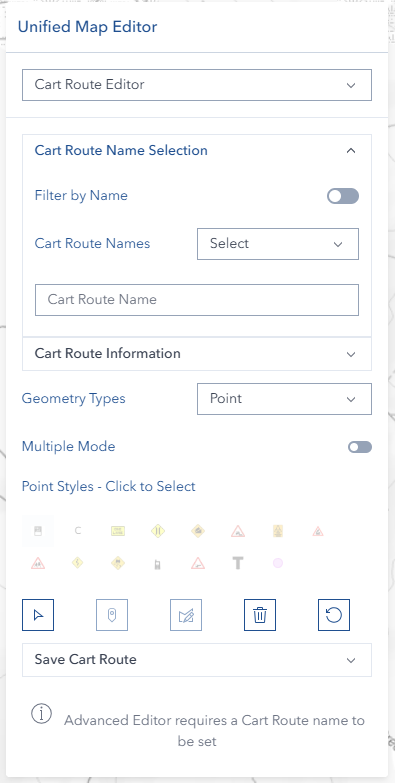
- The editor panel opens with two main sections:
- Cart Route Information panel
- Geometry editing tools
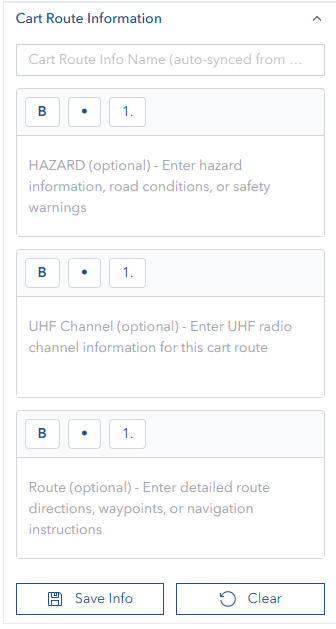
Cart Route Information
The Cart Route Information section allows you to create and manage detailed information about cart routes.
Managing Cart Route Information
- Select an existing cart route from the dropdown or create a new one.
- View the last update timestamp for existing routes.
- Enter or edit the following information:
- Cart Route Info Name (required)
- Hazard information (optional)
- UHF channel details (optional)
- Route description (optional)
- Use the rich text editor to format text with:
- Bold formatting
- Bullet lists
- Numbered lists
- Use the same name to update existing cart route information.

Saving Cart Route Information
- Enter all required information.
- Click the "Save Info" button.
- A success notification will appear when saved.
- Use the "Clear" button to reset all fields.

ℹ️ NOTE
Cart Route Information is stored separately from the geometry. You can create information records without drawing routes on the map.
Geometry Types and Styles
The Cart Route Editor supports two geometry types with various style options.
Geometry Types
- Point: Used for marking specific locations such as departure points, destinations, UHF channels, or labels
- Line: Used for drawing the actual route directions
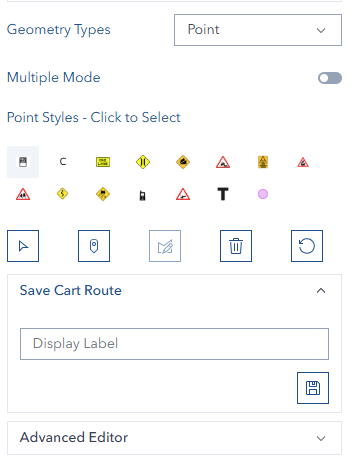
Point Styles
When working with Point geometry, you can choose from the following styles:
| # | Icon | Style Name | Description |
|---|---|---|---|
| 1 | One Lane | Indicate single-lane road sections | |
| 2 | Narrow Bridge | Mark narrow bridge locations | |
| 3 | Steep Road | Indicate steep road sections | |
| 4 | Soft Shoulder | Mark soft shoulder areas | |
| 5 | No UHF | Indicate areas without UHF coverage | |
| 6 | Railway Crossing | Mark railway crossing locations | |
| 7 | School Zone | Indicate school zone areas | |
| 8 | Winding Road | Mark winding road sections | |
| 9 | Slippery When Wet | Indicate slippery road conditions | |
| 10 | Phone Coverage | Mark mobile phone coverage areas | |
| 11 | EMP Location | Mark Emergency Management Point locations |
ℹ️ TIP
Each point style is represented by a unique icon on the map, making it easy to visually distinguish between different types of route features and hazards.
Line Styles
When working with Line geometry, you can choose from the following styles:
- Planned Cart Route - Default route line style for planned routes
- Black Arrow - Directional arrow for indicating route direction
- Unknown - Default/unclassified line style
Drawing and Editing Operations
ℹ️ NOTE
You need to select a name from the dropdown in the Cart Route Information panel before you can draw or edit routes on the map.
Selecting Existing Cart Routes
- Click the "Select" button.
- Click on an existing cart route geometry (points, lines) on the map.
- The selected route will be highlighted and available for editing, and the editing button will be enabled.

Drawing Point Features
- Select "Point" from the Geometry Types dropdown.
- Choose a point style.
- Click the "Draw Point" button.
- Click on the map to place the point.


Drawing Line Features
- Select "Line" from the Geometry Types dropdown.
- Choose a line style.
- Click the "Draw Line" button.
- Click on the map to place vertices of the line.
- Double-click to complete the line.


Editing Features
- Select a feature using the selection tool.
- Click the "Edit" button.
- Click and move if point type or change vertices if line geometry.
- Click away from the geometry or click "Edit" again to finish.

Deleting Features
- Select a feature using the selection tool.
- Click the "Delete" button.
- The feature will be removed from the map and the database.

Resetting the Editor
- Click the "Reset" button.
- All current selections and unsaved edits will be cleared.

Saving and Managing Cart Routes
Saving Cart Routes Geometry
- Create or edit a cart route on the map.
- Open the "Save Cart Route" accordion panel.
- Select an existing name from the dropdown (You can only select names that have been saved in the Cart Route Information panel).
- Optionally, enter a display label (Only for Text Point style points - used for custom labels).
- Click the "Save" button.

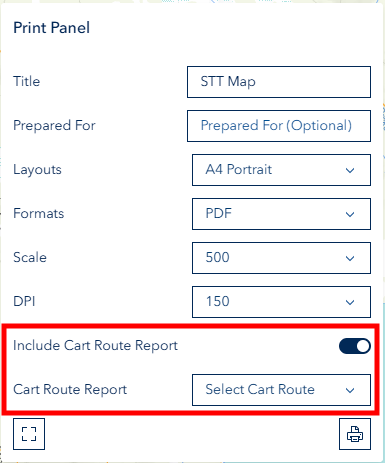
Print Cart Routes Map and Reports
- Switch on the "Include Cart Route Report" toggle.
- Select the desired cart route name from the dropdown.
- Click the "Extent" button to set the print extent.
- Click the "Print" button.
⚠️ IMPORTANT
A cart route must have a name before it can be saved. Ensure you've entered a name in the Cart Route Names dropdown.
Troubleshooting
| Issue | Solution |
|---|---|
| Cannot save cart route | Ensure you've provided a name for the cart route |
| Drawing tools not working | Make sure no selection or edit mode is active |
| Cannot edit a feature | Select the feature first using the selection tool |
| Cannot see saved cart routes | Make sure you have cart route point and line layers on the map |
| Report not showing in print | Ensure you select a Cart Route Report |
Video Tutorials
The following video tutorials demonstrate key workflows for using the Cart Route Editor Tool. Each video provides step-by-step visual instructions to help you master different aspects of the tool.
Basic Workflows
| Tutorial | Description |
|---|---|
| Creating and Saving Information | Learn how to create and save cart route information records |
| Drawing Route Geometries | See how to draw points and lines on the map |
| Editing Route Geometries | Discover techniques for modifying existing routes |
Creating and Saving Cart Route Information
This video demonstrates how to create new cart route information records and save them to the database.
Editing Cart Routes Geometries
Learn how to add point and line features to create complete cart routes on the map.
Deleting Cart Routes Geometries
This tutorial shows how to select and modify existing cart route features.
Advanced Edit Cart Routes Geometries
Learn how to remove unwanted cart route features from the map.
Printing Cart Routes Maps and Reports
This video demonstrates how to generate printable maps and reports for your cart routes.